The routed vs. the routing
There has always been a great attraction for me to the networking protocols. I don’t know why I have always been fascinated by them, but they do interest me greatly. A good deal of my time has been spent studying and playing with the protocols contained in the TCP/IP protocol suite. What all those protocols have in common is that they are routed protocols. This begs the question of what routes them? A very good question indeed, and one that a great many books have been written about.
What I shall cover in this article is a breakdown of what routing protocols are. How they work, and what kinds of routing protocols there are. Things I won’t be covering are the Cisco IOS syntax used when configuring these routing protocols. Quite a few excellent books out there already do an admirable job of doing just that. Instead, as mentioned, I will concentrate on giving you a high level overview of what routing protocols are, the various types, and what it is that they do.
Onwards and upwards
Well we already know that the packets generated by our computers are comprised of routed protocols. These protocols in turn need to be routed if they are to reach their intended recipients. How does a packet ultimately get to its destination? Well this is accomplished via it being routed by a series of routers, and this is also done primarily via the IP address listed in the IP header. With this simplistic explanation in hand we will now take a look at the two categories of routing protocols.
The routing protocols themselves are broken down into two groups. Those are the IGP and EGP, or Interior Gateway Protocols, and Exterior Gateway Protocols. Much like their respective names infer, one group is used internally and the other externally. For example the IGP series of routing protocols are used on internal networks, and the EGP series of routing protocols is used on the actual Internet itself. What does that all really mean though? Well it means that when you do the initial configuration of your, in all likelihood, Cisco router that you will need to choose what type of routing protocol to install and configure.
Now is as good a time as any to list the various types of routing protocols for each group. Interior Gateway Protocols are comprised of the following;
IGRP: Interior Gateway Routing Protocol
EIGRP: Enhanced Interior Gateway Routing Protocol
OSPF: Open Shortest Path First
RIP: Routing Information Protocol
IS-IS: Intermediate System – Intermediate System
For Exterior Gateway Protocols there are;
EGP: Exterior Gateway Protocol
BGP: Border Gateway Protocol
Interior Gateway Protocols
We can see from the above noted examples of IGP protocols that there are several of them. Are they all used in today’s internal networks? Well I suppose they very well could be, but likely the most common ones used today are OSPF and RIP. With that in hand let’s go over RIP. RIP is what is called a dynamic routing protocol. What that means is that it will automatically figure out routing tables on its own. In other words the system administrator does not have to manually input all the various routes. That would be a serious pain in the butt!
So RIP will automatically compute the routes, as well as secondary routes to be used in case a primary path should fail. If you are thinking that this sounds like “load balancing” you would indeed be correct. Another key piece of information to remember about RIP is that it is a “distance vector” protocol. Seen as this article is only a high level overview I will say only that “distance vector” involves the method of discovering routes. For more information on this very important topic please click here. Some key points to remember about RIP are that it uses port 520 and uses UDP as its transport protocol.
OSPF is the other commonly used IGP. A key differentiator between RIP and OSPF is that OSPF is a “link state protocol”. This simply means that it uses a different way to build its routing tables. OSPF enabled routers will advertise metrics which contain the information that the other OSPF enabled routers will use to build its routing tables. It is as simple and as complicated as that. Further reading can be found here. Also, as above, some key points to remember are that OSPF supports multicasting and subnets. Lastly, OSPF uses IP, and not TCP or UDP.
Exterior Gateway Protocols
Well we covered the two main IGP’s at a very high level, but what about the EGP protocols? Well let’s indeed take a look at the two better known ones. BGP or Border Gateway Protocol is the routing protocol in use today by the routers which populate the Internet. By that I mean routers that are used by your ISP for example, or what are also called Internet facing routers. These routers form the backbone of the Internet and BGP v4 is what is currently running on them. Much like RIP above, BGP is essentially itself a distance vector protocol or algorithm. One notable fact about BGP is that it uses TCP for its transport protocol and will communicate via port 179. In other words, routing tables are exchanged using TCP for transport and done via port 179. With that said about BGP, what is there to know about EGP? Well realistically not a whole lot as it is not really used anymore. It has been replaced, if you will, by BGP. Should you wish to read more about it please click here.
Wrapping up
Well as you can see I was not kidding about the high-level overview of routing protocols. There have literally been thick books written on BGP alone. It really is impossible to cover all about these routing protocols in one article, let alone a book. What this article hopes to convey rather is the diversity within the routing protocols themselves, and the difference between them and the routed protocols. What can you do to learn more about these routing protocols? I have always been a big believer in putting concepts into practice. It is, in my opinion, the only way to really learn and furthermore cement lessons learnt.
To that end you should, if financially possible, pick up some used Cisco networking gear. They are not all that expensive to buy and will pay dividends in your quest to know more about how traffic is actually routed. Further to buying some networking gear I would advise you to use programs such as Nemesis which will allow you to craft RIP, OSPF, and IGMP amongst others. Being able to craft some routing protocol packets will also let you see how they react to certain stimulus. Packet crafting is how I initially taught myself about TCP/IP, and I would certainly encourage you to do so with these routing protocols. Doing so will force you to learn more about the protocol itself and how it works. Lastly, as mentioned, getting some networking gear really is the key as much of the protocol configurations must be done via this hardware. You will only get so far by actually reading. If you really are on a limited budget then you may wish to buy one of many available simulators.
Well this brings to an end my high-level overview of routing protocols. I hope that this is enough to whet your appetite and push you to further study this critically important area of computer networks. As always I welcome your feedback, and on that note till next time!
Thursday, January 22, 2009
Exchange Server 2007 SPAM filtering features without using Exchange Server 2007 Edge Server
Introduction
Many Exchange Server administrators know how to use features from Exchange Server 2003 which will not be available by default, if they do not use Exchange Server 2007 Edge Server Role as message hygiene server in the DMZ. This feature is only available within that role by default but can be enabled on each Exchange Server 2007 running Hub Transport Role. In this article we will have a look how to enable and configure this feature.
Activating AntiSpamAgent Feature
Adding this functionality to your Hub Transport servers is a pretty simple process. First, launch the Exchange Management Shell. In the Scripts folder that was created, you will find a PowerShell script to install the Anti-spam agents. After you run this command, you will need to restart your transport service and restart the Exchange Management Console. The script we need to run is called install-AntiSpamAgents.ps1.
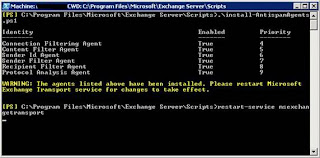
Figure 1: Activating AntiSpamAgent Feature
After restarting the Exchange Transport Service, we have a new tab in Exchange Management Console available which will look like this:
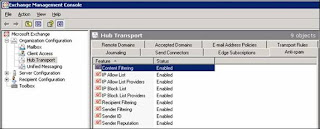
Figure 2: The Anti-Spam Tab of Exchange Management Console
Note:
We will now take a closer look into each feature of Anti-Spam:
Content Filtering
IP Allow List
IP Allow List Providers
IP Block List
IP Block List Providers
Recipient Filtering
Sender Filtering
Sender ID
Sender Reputation
Content Filtering
The Content Filter agents works with spam confidence level rating. This rating is a number from 0-9 for each message; a high SCL will mean that it is most likely spam. You can configure the agent according to the message ratings to:
Delete the message
Reject the message
Quarantine the message
You can also customize this filter using your own custom words and configure exceptions if you wish.
IP Allow List
With this feature you are able to configure which IP addresses are allowed to successfully connect to your Exchange Server. So, if you probably have a dedicated mail relay server in your DMZ, you can add its IP addresses so that your server will not accept connections from other servers anymore.
IP Allow List Providers
In general, you are unable to configure your own “IP Allow Lists” without making mistakes that will lead to problems receiving emails from your customers or any other business partners. Therefore, you should contact a public IP allow list provider which does the work for you. This would mean that you will have more quality in this service and a higher business value.
IP Block Lists
This feature gives you the possibility to configure IP addresses that are not allowed to connect to your server. Contrary to “IP Allow Lists”, this feature provides a black list and not a white one.
IP Block List Providers
“IP Block List Providers” have been known in the past as “Blacklist Providers” too. Their task is to publish lists from servers / IP addresses that are spamming.
Recipient Filtering
If you need to block emails to specific internal users or domains, this feature is the one you will need. You can configure this feature and then add the appropriate addresses or SMTP domains to your black list. Another interesting feature is that it allows you to set up the configuration so that only you will accept emails from recipients that are included in your global address lists.
Sender Filtering
If you need to block specific domains or external email addresses, you will have to use this feature. You can configure a black list of what sender addresses or domains you will accept or not.
Sender ID
The Sender ID agent relies on the RECEIVED Simple Mail Transfer Protocol (SMTP) header and a query to the sending system's domain name system (DNS) service to determine what action, if any, to take on an inbound message. This feature is relatively new and relies on the need of a specific DNS setting.
Sender ID is intended to combat the impersonation of sender and domain also called spoofing. A spoofed mail is an e-mail message that has a sending address that was modified to appear as if it originates from a sender other than the actual sender of the message. Spoofed mails typically contain a FROM in the header of a message that claims to originate from a dedicated organization.
The Sender ID evaluation process generates a Sender ID status for each message. The Sender ID status is used to evaluate the SCL rating for that message. This status can have one of the following settings:
Pass - IP address is included the permitted set
Neutral - Published Sender ID data is explicitly inconclusive.
Soft fail - IP address may be in the not permitted set.
Fail - IP address is in the not permitted set.
None - No published data in DNS.
TempError - transient error occurred, such as an unavailable DNS server
PermError - unrecoverable error occured, such as the record format error
The Sender ID status is added to email metadata and is then converted to a MAPI property. The Junk E-mail filter in Microsoft Office Outlook uses the MAPI property during the generation of the spam confidence level (SCL) value.
You can configure this feature to act as the following:
Stamp the status
Reject
Delete
Sender Reputation
Sender Reputation is a new Exchange Server 2007 anti-spam functionality that is intended to block messages based on many characteristics.
The calculation of the Sender Reputation Level is based on the following information:
HELO/EHLO analysis
Reverse DNS lookup
Analysis of SCL
Sender open proxy test
Sender reputation weighs each of these statistics and calculates an SRL for each sender. The SRL is a number between 0 and 9. You can then configure what to do with the message in one of the following ways:
Reject
Delete and archive
Accept and mark as blocked sender
Conclusion
As you have seen in this article, Exchange Server 2007 provides a lot of features to increase anti-spam functionality on each Exchange Server box. If you do not use a dedicated Exchange Edge Server, you can add this functionality to Exchange Server 2007 Hub Transport as described above. If you define a configuration for your specific server design, you will not have to add third party software to meet your basic business needs.
If you decide to have more than the described functions above, you should think of implementing Microsoft ForeFront Security for Exchange Servers.
Subscribe to:
Posts (Atom)