Saturday, April 25, 2009

Cross-forest Mailbox Moves using the Exchange Management Console

Another great feature in the Exchange 2010 Management Console is that you now can do cross-forest mailbox moves using the new “New Move Request” wizard. To launch this wizard right-click a User Mailbox in the EMC, then select New Move Request in the context menu as shown in the figure below.


This brings up the wizard shown next. Here you can specify to which Exchange organization you want to move a mailbox.


Note
Before you can perform a cross-forest move, you must add the Exchange org in the target forest to the EMC. In addition, you must have the AD account of the source user mailbox migrated/replicated to the target forest using ILM or a similar tool. Yes doesn’t work like the Move-Mailbox cmdlet did in Exchange 2007, where the AD object would be created if it didn’t already exist.

Online Mailbox Moves with the Exchange Management Shell

A cool improvement revolving around mailbox moves in Exchange 2010 is that they by default are done in so called online mode. That is the Outlook client won’t be disconnected while a user’s mailbox is being moved. Only end-user impact is that with Outlook 2003/2007, the user is asked to restart Outlook after the mailbox moved has been completed.

There’s still support for the Move-Mailbox cmdlet, but in Exchange 2010 you’re supposed to use the New-MoveRequest and Complete-MoveRequest cmdlets when performing mailbox moves.

To move one mailbox enter: New-MoveRequest –Local –TargetDatabase

Note
It’s not required to specify a target database, if you don’t one will be picked randomly.


While mailboxes are moved, you can type Get-MoveRequest | fl to see the status for the mailbox move.


When the mailbox data has been moved to another mailbox database, you can finish the move using Complete-MoveRequest . Note this is the command that will trigger the warning in the end-user’s Outlook client in regards to the requested restart.

Exchange 2010 Database Availability Groups

Because I deal a lot with HA/site resilience in my job as a Technology Architect, one of my favorite features in Exchange 2010 is naturally the new Database Availability Group (DAG) HA/site resilience feature, which replaces CCR/SCR/LCR. Also note that SCC has been deprecated/cut with Exchange 2010.

DAG built on the functionality we know from CCR and SCR, that is it still uses asynchronous log shipping and replay etc.

An interesting thing about DAGs is that you’re no longer required to form a cluster before you install the MBX server role. The limited cluster features that are used by DAGs (primarily cluster heartbeat and quorum) are configured automatically when adding the first MBX server to the DAG and thereby more or less invisible to the administrator.

With DAG you can have up to 16 copies of a Mailbox database. In addition, you can also have other Exchange 2010 server roles such as HT and CAS installed on the MBX server which is member of a DAG. Also, you can have DAG members located on different subnets and in separate AD sites.


There’s a lot to say about DAG, but I’ll stop here and instead let you know I currently am writing a multi-part articles series on this very subject. Look forward to seeing it published here on MSExchange.org in a near future.

Connecting to a remote Exchange 2010 Organization using Remote PowerShell

In this blog post I wanted to show you how you can connect to an Exchange 2010 server in a remote organization using Remote PowerShell (Windows PowerShell 2.0) running on a Windows client/server. In this specific example, I’ve installed Windows PowerShell V2 CTP3 and WSMan on a Windows 2008 server).

First step is to launch Windows PowerShell. Then we will create a variable storing the credentials for the administrator in the remote Exchange 2010 organization. We do so using the below command:

$UserCredential = Get-Credential


Now enter the credentials of the administrator account from the remote Exchange 2010 organization.


We will now connect to the remote Exchange 2010 organization by specifying the name of an Exchange 2010 server in that specific organization. In this particular example we use the following command:

$Session = New-PSSession –ConfigurationName Microsoft.Exchange –ConnectionUri https://E2K10EX01/PowerShell/ –Credential $UserCredential


Note
In order to connect to the remote Exchange 2010 organization, your local machine must either trust the certificate on the specific Exchange 2010 server you connect to or you must use the -SessionOption $SkipCertificate parameter in the above command.

We now need to import the server-side PowerShell session which is done with the following command:

Import-PSSession $Session


The cmdlets etc. will now be imported to the client-side session. You will probably get a few warning because some of the cmdlet’s already are available in the client-side session. as can be seen below.


Now let’s try to issue a command against the remote Exchange organization. In the below figure, I retrieve details for an Exchange 2010 server in the remote Exchange organization.


Let’s try to create an Exchange object and then manipulate it afterwards. Below I create a new distribution group and then add a user mailbox to it.


We’ll now switch to an Exchange 2010 Management Console in the remote org and verify the distribution group were created properly and that the user mailbox were added to it.


When finished administering the remote Exchange 2010 organization, you can disconnect the the client-side session using:

Remove-PSSession $Session

Yes Windows PowerShell in Exchange 2007 was pretty cool, but it simply rocks in Exchange 2010

Installing E2K7 and E2K10 Management tools on the same machine

When the time comes where you need to transition from Exchange 2007 to Exchange 2010, depending on the size of your organization, it can take weeks, months or in some cases even years to complete the transition. During the co-existence period, you would need to manage both Exchange 2007 and Exchange 2010 users, groups, servers and so on. Since some Exchange 2007 objects must be managed using the Exchange 2007 Management Console or Shell and most Exchange 2010 objects must be managed using the Exchange 2010 Management console or Shell, it would be nice if you could just install both management tool version on the same machine right? Guess what? Yes this is in fact possible.

Just install the prerequisites for the Exchange 2010 Management tools. Then install the Exchange 2010 Management tools followed by the Exchange 2007 Management tools.

You can now open the management tools for both versions from the start menu as shown below.


You can even have the management tools for each version run side by side.


And since both Exchange 2007 and 2010 management tools are based on MMC 3.0, you could as well add the respective snap-in for each version to the same MMC console.


You can of course also run each version of the Exchange Management Shell by side.


Pretty cool huh?

Sunday, March 1, 2009

Customizing Managed Folders in Exchange Server 2007

Exchange Server 2007 allows an administrator to manage the default managed folders and also the managed custom folders which are used by the Message Records Management (MRM) feature. My fellow MVP Neil Hobson created an article series about Messaging Records Management and you can check this out at: Exchange 2007 Messaging Records Management (part 1).

In this article we are going to validate how an Exchange admin is able to improve the end-user experience with some features available in the Managed Folders. By using such features, we can educate the users to use these new resources properly.

Configuring a personalized display page for Managed Folders

First of all, let us pick a server with IIS installed. We will then create a virtual directory on this server to host a page that will instruct the users on how to use Managed Folders. This page will be accessed when a user clicks on the “Managed folder” item in their Outlook 2007 client. You can use your current CAS server to host this webpage or any other IIS in your environment.

Now that we are logged onto the chosen server we can follow these steps:

1. Open IIS Manager.
2. Expand Web Site.
3. Right click on Default Web Site and click on New and then on Virtual Directory.
4. In the first page of Virtual Directory wizard, click Next.
5. Virtual Directory Alias. Type in ManagedFolderHP and click on Next. (Figure 01)


Figure 01

6. Web Site Content Directory. Choose the local path where all pages related to the Managed Folder HP virtual directory will be kept and click on Next.
7. Virtual Directory Access Permissions. You can leave the default settings and click Next.
8. Final wizard page, click on Finish.

Note:
If you are using a IIS/CAS Server in NLB make sure that you copy and update the content of the Managed Folder page in both servers and also that the Exchange configuration that we are going to see next is using the NLB name.

Now, create a set of pages demonstrating how to use Managed Folders and instruct the users to use this resource step by step. By the way, you can use multiple pages and create a link between them (use pictures and so forth). Before testing the page, let us validate these points:

- Validate if you can access using http or https. If you website is configured to require SSL you will be able to access only using SSL unless you check that option.
- Make sure that in the properties of the Virtual Directory on Documents tab the main page that you created is listed.
- Try to access from any client computer the page that you have just created, if you are able to access it we are ready to go to the Exchange Server 2007 organization configuration.

Next step, Open Exchange Management Shell, and let’s set the page that we have just tested configuring the ManagedFolderHomePage attribute, as shown in Figure 02. The following cmdlet can be used:

Set-OrganizationConfig –ManagedFolderHomePage:http:///ManagedFolderHP

You can also run Get-OrganizationConfig cmdlet afterwards to validate the current organization parameter.


Figure 02

The Exchange Server configuration and website configuration are done, now we have to test the solution on the client side. In order to test it, just click on Managed Folders item under Mailbox and on the right side the page that we have configured, as shown in Figure 03.


Figure 03

If you have clients using Outlook Anywhere you should consider using a public URL instead of a local one, and also publishing it on your Firewall for external access. Besides that, the URL configured must be accessible from both locations: internal and external. In some cases you may have to play with DNS resolution.

Managing Folder description

Using Exchange Server 2007 we can configure comments for Managed Default Folders (like Inbox, Calendar, Outbox and so forth) and also Managed Custom Folders (those folders created by the Administrator and they are located under Managed Folders in the Outlook client). A comment can be seen in OWA, Outlook 2007 and Outlook 2003 SP2 or superior (In Outlook 2003 or higher, the comment does not appear like in the new versions, the user must click on View menu and Policy to see the comments).

In order to manage comments in a folder you can use either Exchange Management Console or Exchange Management Shell, we can follow these steps to manage comments:

1. Open Exchange Management Console.
2. Expand Organization Configuration.
3. Click on Mailbox.
4. Click on Managed Default Folders or Managed Custom Folders tab. In this article we are going to add a comment on Inbox folder, then let’s click on Managed Default Folders tab.
5. Double click on Inbox.
6. Inbox Properties. We can enter the comment that will be displayed for all users and we have a check box that enable or disable the user to minimize this comment. (Figure 04).


Figure 04

We can do the same using Exchange Management Shell using the following syntax:

"Set-ManagedFolder -Comment: " -"MustDisplayCommentEnabled:<$true/$false>"

We can take advantage of Exchange Management Shell and use pipeline to retrieve extra information that we cannot get from Exchange Management Console, such as:

Getting all the information about Managed Folder object
Get-ManagedFolder | FL
Getting all Managed Folders that have Comment associated
Get-ManagedFolder | where { $_.Comment –ne ‘’ }
Getting all Managed Folders that have Comment
Get-ManagedFolder | where { $_.MustDisplayCommentEnabled –eq 1 }

Now, we can go back to the Outlook Client and click on Inbox item and we will have the comment created before showing up on the right, as shown in Figure 05.


Figure 05

The comment configuration is also displayed in an Outlook Web Access session, as shown in Figure 06.


Figure 06

If you have done all the process described previously and the Folder Comment is not showing, we can use the following steps to troubleshoot the process:

1. Validate the Managed Default Folders and/or Managed Custom Folders

Validate which folders you have configured to use comments. In this article we are going to troubleshoot the Inbox folder.
Validate the Policy

2. Open Exchange Management Console.
3. Expand Organization Configuration.
4. Click on Mailbox.
5. Click on Managed Folder Mailbox Policies tab.
6. Double click on the desired policy and make sure that the folder that we have changed is listed, as shown in Figure 07.


Figure 07

Validate the user configuration

7. Open Exchange Management Console.
8. Expand Recipient Configuration.
9. Double click on the desired mailbox.
10. Click on Mailbox Settings tab.
11. Select Message Records Management.
12. Click on Properties button.
13. Make sure that Managed folder mailbox policy is checked and you are using the same policy that we have just seen in the previous step. (Figure 08).


Figure 08

Force the updates

14. You can force at server level or user level, these two cmdlets will do the trick:
Start-ManagedFolderAssistant –Mailbox
Start-ManagedFolderAssistant –Identity
15. Finally, you can go back to the client and the Folder’s comment will be there.

Conclusion

In this article we have seen how to manage Exchange Server 2007 to display information to an end-user using the Folder’s comments. We have also seen how to use a personalized page and utilize it with the Managed Folder features.

Monday, February 2, 2009

Troubleshooting Logon Problems

Logging into a computer is such a routine part of the day that it is easy to not even think about the login process. Even so, things can and occasionally do go wrong when users log into Windows. In this article, I will talk about some of the things that can cause logon failures, and show you how to get around those problems.

Before I Begin

Before I get started, I just want to quickly mention that in order to provide as much useful information as possible, I am going to avoid talking about the most obvious causes of logon failures. This article assumes that before you begin the troubleshooting process, you have checked to make sure that the user is entering the correct password, the user's password has not expired, and that there are no basic communications problems between the workstation and the domain controller.

The System Clock

It may seem odd, but a workstation's clock can actually be the cause of a logon failure. If the clock is more than five minutes different from the time on your domain controllers, then the logon will fail.

In case you are wondering, the reason for this has to do with the Kerberos authentication protocol. At the beginning of the authentication process, the user enters their username and password. The workstation then sends a Kerberos Authentication Server Request to a the Key Distribution Server. This Kerberos Authentication Server Request contains several different pieces of information, including:

- The user’s identification
- The name of the service that the user is requesting (in this case it’s the Ticket Getting Service)
- An authenticator that is encrypted with the user’s master key. The user’s master key is derived by encrypting the user’s password using a one way function.

When the Key Distribution Server receives the request, it looks up the user’s Active Directory account. It then calculates the user’s master key and uses it to decrypt the authenticator (also known as pre authentication data).

When the user’s workstation created the authenticator, it placed a time stamp within the encrypted file. Once the Key Distribution Server decrypts this file, it compares the time stamp to the current time on its own clock. If the time stamp and the current time are within five minutes of each other, then the Kerberos Authentication Server Request is assumed to be valid, and the authentication process continues. If the time stamp and the current time are more than five minutes apart, then Kerberos assumes that the request is a replay of a previously captured packet, and therefore denies the logon request. When this happens, the following message is displayed:

The system cannot log you on due to the following error: There is a time difference between the client and server. Please try again or consult your system administrator.

The solution to the problem is simple; just set the workstation’s clock to match the domain controller’s clock.

Global Catalog Server Failures
Another major cause of logon problems is a global catalog server failure. A global catalog server is a domain controller that has been configured to act as a global catalog server. Global catalog servers contain a searchable representation of every object in every domain of the entire forest.

When the forest is initially created, the first domain controller that you bring online is automatically configured to act as a global catalog server. The problem is that this server can become a single point of failure, because Windows does not automatically designate any other domain controllers to act as global catalog servers. If the global catalog server fails, then only domain administrators will be able to log into the Active Directory.

Given the global catalog server’s importance, you should work to prevent global catalog server failures. Fortunately, you can designate any or all of your domain controllers to act as global catalog servers. Keep in mind though that you should only configure all of your domain controllers to act as global catalog servers if your forest consists of a single domain. Having multiple global catalog servers is a good idea even for forests with multiple domains, but figuring out which domain controllers should act as global catalog servers is something of an art form. You can find Microsoft’s recommendations here.

If your global catalog server has already failed, and nobody can log in, then the best thing that you can do is work to return the global catalog server to a functional state. There is a way of allowing users to log in even though the global catalog server is down, but there are security risks associated with doing so.

If the Active Directory is running in native mode, then the global catalog server is responsible for checking user’s universal group memberships. If you choose to allow users to logon during the failure, then universal group memberships will not be checked. If you have assigned explicit denials to members of certain universal groups, then those denials will not be in effect until the global catalog server is brought back online.

If you decide that you must allow users to log on, then you will have to edit the registry on each of your domain controllers. Keep in mind that editing the registry is dangerous, and that making a mistake can destroy Windows. I therefore recommend making a full system backup before continuing.

With that said, open the Registry Editor and navigate through the registry tree to HKEY_LOCAL_MACHINE\SYSTEM\CurrentControlSet\Control\Lsa. Now, create a new DWORD value named IgnoreGCFailures, and set the value to 1. You will have to restart the domain controller after making this change.

DNS Server Failure
If you suddenly find that none of your users can log into the network, and your domain controllers and global catalog servers seem to be functional, then a DNS server failure might have occurred. The Active Directory is completely dependent on the DNS services.

The DNS server contains host records for each computer on your network. The computers on your network use these host records to resolve computer names to IP addresses. If a DNS server failure occurs, then host name resolution will also fail, eventually impacting the logon process.

There are two things that you need to know about DNS failures in regard to troubleshooting logon problems. First, the logon failures may not happen immediately. The Windows operating system maintains a DNS cache, which includes the results of previous DNS queries. This cache prevents workstations from flooding DNS servers with name resolution requests for the same objects over and over.

In many cases, workstations will have cached the IP addresses of domain controllers and global catalog servers. Even so, items in the DNS cache do eventually expire and will need to be refreshed. You will most likely start noticing logon problems when cached host records begin to expire.

The other thing that you need to know about DNS server failures is that often times there are plenty of other symptoms besides logon failures. Unless machines on your network are configured to use a secondary DNS server in the event that the primary DNS server fails, the entire Active Directory environment will eventually come to a grinding halt. Although there are exceptions, generally speaking, the absence of a DNS server on an Active Directory network basically amounts to a total communications breakdown.

Conclusion
Although I have discussed some of the major causes of logon failures on Active Directory networks, an important part of the troubleshooting process is to look at how widespread the problem is. For example, if only a single host on a large network is having logon problems, then you can probably rule out DNS or global catalog failures. If a DNS or a global catalog failure were to blame, then the problem would most likely be much more wide spread. If the problem is isolated to a single machine, then the problem is most likely related to the machine’s configuration, connectivity, or to the user’s account.

Thursday, January 22, 2009

Routing Protocols

The routed vs. the routing
There has always been a great attraction for me to the networking protocols. I don’t know why I have always been fascinated by them, but they do interest me greatly. A good deal of my time has been spent studying and playing with the protocols contained in the TCP/IP protocol suite. What all those protocols have in common is that they are routed protocols. This begs the question of what routes them? A very good question indeed, and one that a great many books have been written about.

What I shall cover in this article is a breakdown of what routing protocols are. How they work, and what kinds of routing protocols there are. Things I won’t be covering are the Cisco IOS syntax used when configuring these routing protocols. Quite a few excellent books out there already do an admirable job of doing just that. Instead, as mentioned, I will concentrate on giving you a high level overview of what routing protocols are, the various types, and what it is that they do.

Onwards and upwards
Well we already know that the packets generated by our computers are comprised of routed protocols. These protocols in turn need to be routed if they are to reach their intended recipients. How does a packet ultimately get to its destination? Well this is accomplished via it being routed by a series of routers, and this is also done primarily via the IP address listed in the IP header. With this simplistic explanation in hand we will now take a look at the two categories of routing protocols.

The routing protocols themselves are broken down into two groups. Those are the IGP and EGP, or Interior Gateway Protocols, and Exterior Gateway Protocols. Much like their respective names infer, one group is used internally and the other externally. For example the IGP series of routing protocols are used on internal networks, and the EGP series of routing protocols is used on the actual Internet itself. What does that all really mean though? Well it means that when you do the initial configuration of your, in all likelihood, Cisco router that you will need to choose what type of routing protocol to install and configure.

Now is as good a time as any to list the various types of routing protocols for each group. Interior Gateway Protocols are comprised of the following;

IGRP: Interior Gateway Routing Protocol
EIGRP: Enhanced Interior Gateway Routing Protocol
OSPF: Open Shortest Path First
RIP: Routing Information Protocol
IS-IS: Intermediate System – Intermediate System
For Exterior Gateway Protocols there are;

EGP: Exterior Gateway Protocol
BGP: Border Gateway Protocol

Interior Gateway Protocols
We can see from the above noted examples of IGP protocols that there are several of them. Are they all used in today’s internal networks? Well I suppose they very well could be, but likely the most common ones used today are OSPF and RIP. With that in hand let’s go over RIP. RIP is what is called a dynamic routing protocol. What that means is that it will automatically figure out routing tables on its own. In other words the system administrator does not have to manually input all the various routes. That would be a serious pain in the butt!

So RIP will automatically compute the routes, as well as secondary routes to be used in case a primary path should fail. If you are thinking that this sounds like “load balancing” you would indeed be correct. Another key piece of information to remember about RIP is that it is a “distance vector” protocol. Seen as this article is only a high level overview I will say only that “distance vector” involves the method of discovering routes. For more information on this very important topic please click here. Some key points to remember about RIP are that it uses port 520 and uses UDP as its transport protocol.

OSPF is the other commonly used IGP. A key differentiator between RIP and OSPF is that OSPF is a “link state protocol”. This simply means that it uses a different way to build its routing tables. OSPF enabled routers will advertise metrics which contain the information that the other OSPF enabled routers will use to build its routing tables. It is as simple and as complicated as that. Further reading can be found here. Also, as above, some key points to remember are that OSPF supports multicasting and subnets. Lastly, OSPF uses IP, and not TCP or UDP.

Exterior Gateway Protocols
Well we covered the two main IGP’s at a very high level, but what about the EGP protocols? Well let’s indeed take a look at the two better known ones. BGP or Border Gateway Protocol is the routing protocol in use today by the routers which populate the Internet. By that I mean routers that are used by your ISP for example, or what are also called Internet facing routers. These routers form the backbone of the Internet and BGP v4 is what is currently running on them. Much like RIP above, BGP is essentially itself a distance vector protocol or algorithm. One notable fact about BGP is that it uses TCP for its transport protocol and will communicate via port 179. In other words, routing tables are exchanged using TCP for transport and done via port 179. With that said about BGP, what is there to know about EGP? Well realistically not a whole lot as it is not really used anymore. It has been replaced, if you will, by BGP. Should you wish to read more about it please click here.

Wrapping up
Well as you can see I was not kidding about the high-level overview of routing protocols. There have literally been thick books written on BGP alone. It really is impossible to cover all about these routing protocols in one article, let alone a book. What this article hopes to convey rather is the diversity within the routing protocols themselves, and the difference between them and the routed protocols. What can you do to learn more about these routing protocols? I have always been a big believer in putting concepts into practice. It is, in my opinion, the only way to really learn and furthermore cement lessons learnt.

To that end you should, if financially possible, pick up some used Cisco networking gear. They are not all that expensive to buy and will pay dividends in your quest to know more about how traffic is actually routed. Further to buying some networking gear I would advise you to use programs such as Nemesis which will allow you to craft RIP, OSPF, and IGMP amongst others. Being able to craft some routing protocol packets will also let you see how they react to certain stimulus. Packet crafting is how I initially taught myself about TCP/IP, and I would certainly encourage you to do so with these routing protocols. Doing so will force you to learn more about the protocol itself and how it works. Lastly, as mentioned, getting some networking gear really is the key as much of the protocol configurations must be done via this hardware. You will only get so far by actually reading. If you really are on a limited budget then you may wish to buy one of many available simulators.

Well this brings to an end my high-level overview of routing protocols. I hope that this is enough to whet your appetite and push you to further study this critically important area of computer networks. As always I welcome your feedback, and on that note till next time!

Exchange Server 2007 SPAM filtering features without using Exchange Server 2007 Edge Server

Introduction
Many Exchange Server administrators know how to use features from Exchange Server 2003 which will not be available by default, if they do not use Exchange Server 2007 Edge Server Role as message hygiene server in the DMZ. This feature is only available within that role by default but can be enabled on each Exchange Server 2007 running Hub Transport Role. In this article we will have a look how to enable and configure this feature.

Activating AntiSpamAgent Feature
Adding this functionality to your Hub Transport servers is a pretty simple process. First, launch the Exchange Management Shell. In the Scripts folder that was created, you will find a PowerShell script to install the Anti-spam agents. After you run this command, you will need to restart your transport service and restart the Exchange Management Console. The script we need to run is called install-AntiSpamAgents.ps1.


Figure 1: Activating AntiSpamAgent Feature

After restarting the Exchange Transport Service, we have a new tab in Exchange Management Console available which will look like this:


Figure 2: The Anti-Spam Tab of Exchange Management Console

Note:

We will now take a closer look into each feature of Anti-Spam:

Content Filtering
IP Allow List
IP Allow List Providers
IP Block List
IP Block List Providers
Recipient Filtering
Sender Filtering
Sender ID
Sender Reputation
Content Filtering
The Content Filter agents works with spam confidence level rating. This rating is a number from 0-9 for each message; a high SCL will mean that it is most likely spam. You can configure the agent according to the message ratings to:

Delete the message
Reject the message
Quarantine the message
You can also customize this filter using your own custom words and configure exceptions if you wish.

IP Allow List
With this feature you are able to configure which IP addresses are allowed to successfully connect to your Exchange Server. So, if you probably have a dedicated mail relay server in your DMZ, you can add its IP addresses so that your server will not accept connections from other servers anymore.

IP Allow List Providers
In general, you are unable to configure your own “IP Allow Lists” without making mistakes that will lead to problems receiving emails from your customers or any other business partners. Therefore, you should contact a public IP allow list provider which does the work for you. This would mean that you will have more quality in this service and a higher business value.

IP Block Lists
This feature gives you the possibility to configure IP addresses that are not allowed to connect to your server. Contrary to “IP Allow Lists”, this feature provides a black list and not a white one.

IP Block List Providers
“IP Block List Providers” have been known in the past as “Blacklist Providers” too. Their task is to publish lists from servers / IP addresses that are spamming.

Recipient Filtering
If you need to block emails to specific internal users or domains, this feature is the one you will need. You can configure this feature and then add the appropriate addresses or SMTP domains to your black list. Another interesting feature is that it allows you to set up the configuration so that only you will accept emails from recipients that are included in your global address lists.

Sender Filtering
If you need to block specific domains or external email addresses, you will have to use this feature. You can configure a black list of what sender addresses or domains you will accept or not.

Sender ID
The Sender ID agent relies on the RECEIVED Simple Mail Transfer Protocol (SMTP) header and a query to the sending system's domain name system (DNS) service to determine what action, if any, to take on an inbound message. This feature is relatively new and relies on the need of a specific DNS setting.

Sender ID is intended to combat the impersonation of sender and domain also called spoofing. A spoofed mail is an e-mail message that has a sending address that was modified to appear as if it originates from a sender other than the actual sender of the message. Spoofed mails typically contain a FROM in the header of a message that claims to originate from a dedicated organization.

The Sender ID evaluation process generates a Sender ID status for each message. The Sender ID status is used to evaluate the SCL rating for that message. This status can have one of the following settings:

Pass - IP address is included the permitted set
Neutral - Published Sender ID data is explicitly inconclusive.
Soft fail - IP address may be in the not permitted set.
Fail - IP address is in the not permitted set.
None - No published data in DNS.
TempError - transient error occurred, such as an unavailable DNS server
PermError - unrecoverable error occured, such as the record format error
The Sender ID status is added to email metadata and is then converted to a MAPI property. The Junk E-mail filter in Microsoft Office Outlook uses the MAPI property during the generation of the spam confidence level (SCL) value.

You can configure this feature to act as the following:

Stamp the status
Reject
Delete

Sender Reputation
Sender Reputation is a new Exchange Server 2007 anti-spam functionality that is intended to block messages based on many characteristics.

The calculation of the Sender Reputation Level is based on the following information:

HELO/EHLO analysis
Reverse DNS lookup
Analysis of SCL
Sender open proxy test
Sender reputation weighs each of these statistics and calculates an SRL for each sender. The SRL is a number between 0 and 9. You can then configure what to do with the message in one of the following ways:

Reject
Delete and archive
Accept and mark as blocked sender
Conclusion
As you have seen in this article, Exchange Server 2007 provides a lot of features to increase anti-spam functionality on each Exchange Server box. If you do not use a dedicated Exchange Edge Server, you can add this functionality to Exchange Server 2007 Hub Transport as described above. If you define a configuration for your specific server design, you will not have to add third party software to meet your basic business needs.

If you decide to have more than the described functions above, you should think of implementing Microsoft ForeFront Security for Exchange Servers.

Thursday, December 25, 2008

Implementing Captcha Validation with OWA 2007 and Forms-Based Authentication

A while back, I wrote an article describing how to add a CAPTCHA image and text input field to the Outlook Web Access 2003 Forms-based Authentication logon form. Now that Exchange 2007 is established in the marketplace, I have received a number of requests for an updated article describing how to do the same for Exchange 2007. While the procedure is mostly similar to the OWA 2003 version, there are several important differences in the detail.

CAPTCHA stands for Completely Automated Public Turing test to tell Computers and Humans Apart. You will no doubt have seen this implemented in various web pages as an image of a visually distorted common word, which must be typed into an input field, thus proving that you are indeed a real person. This has become necessary to prevent the actions of bots, which roam the web looking for opportunities to inject spam into message boards, etc. Shown here in Figure 1 is an example of such an image. The idea is that a human user will recognize the word 'part', whereas a spambot will not.


Figure 1: A CAPTCHA image displaying the word 'part'

OWA Forms-based Authentication is very secure by itself, of course, since you still need to supply valid credentials to log in, but there is still a significant amount of interest in adding CAPTCHA validation to it. Here, I will show how it can be done by modifying Exchange's logon.aspx file. I have chosen to use a freely available CAPTCHA script written by Jonathan Feaster, which is available for download from Archreality . This script uses JavaScript, and unlike some other solutions has the advantage of not requiring a second .aspx page to process the form input; the validation is done by the user's browser before the credentials are sent to the OWA server. Any CAPTCHA scripts which require a second page will not work with FBA, since there is no opportunity to insert anything between the logon page and the OWA GUI.

Procedure

First, extract the files to a suitable place on the server. There are two .js files, and a folder named cimg, which contains the word images to be displayed on the logon page. Place the entire extracted jcap folder in the C:\Program Files\Microsoft\Exchange Server\ClientAccess\Owa\auth folder as shown in figure 2:


Figure 2: The extracted jcap files in the auth folder

Next, use Explorer to locate the logon.aspx file that creates the FBA logon page. This is inside the same auth folder that you just placed the jcap folder into. Before doing anything else, make a backup copy of the logon.aspx file. Right-click it, then select Copy, then right-click the folder, and then select Paste. This creates a copy of your logon.aspx file named 'Copy of logon.aspx' . If your modifications are unsuccessful, you will need to revert to this original file to restore FBA functionality. Now, open the logon.aspx using Notepad. I'm going to insert the image just above the 'Public Computer' radio button, so press F3 and search for the text rdoPblc . Assuming that you successfully found the text, insert the following just before the preceding tag:


Enter the code as it is shown below


The result should look something like figure 3:


Figure 3: The amended contents of logon.aspx in Notepad

Next, press CTRL-HOME to go back to the top of the file, and then press CTRL-F, and search for the text

onsubmit="return doJcap();"

This part of the page should now look like that shown in figure 4:


Figure 4: The modified tag

Now save the file back to disk, and close Notepad. All that is required now is a small change to the jcap.js file that was saved in C:\Program Files\Microsoft\Exchange Server\ClientAccess\Owa\auth\jcap . Right-click the jcap.js file, and select Edit. It should open in Notepad. On the line that begins with var imgdir, you need to change the path to point to the current location of the cimg folder. Change it so that the beginning of the line looks like this:

var imgdir = "/owa/auth/jcap/cimg/";

The complete line looks like this:


Figure 5: Defining the path to the image files

Save the file, and we're finished. The next time you open the FBA logon page, it should look something like this (figure 6). Also shown is the alert message displayed if the typed text does not match the distorted text in the image when you click the Log On button.


Figure 6: The modified FBA logon page

Please remember that due to updates made by Exchange service packs and patches, future versions of the logon.aspx file may be different to the version shown. The basic principles described should, however, remain the same.

Exchange 2007 Availability Services

I do not know about you, but when I think of the Client Access Server role in Exchange 2007, I immediately think of Outlook Web Access, Outlook Anywhere, ActiveSync and other non-MAPI forms of connectivity to the mailbox server. However, the Client Access Server role is also home to other important services such as the Autodiscover and Availability services. These are vital services in the Exchange 2007 infrastructure and in this article we will be taking an introductory and thus high-level look at the Availability service and what its main role is.

What is The Availability Service?

The availability service in Exchange 2007 is largely concerned with how users access the free/busy information of other users. Before we get into the detail of this service, it’s important to review how the free/busy information is stored and accessed in Exchange 2000 and Exchange 2003 so that we can draw comparisons on how the process works in these older versions of Exchange and more importantly what has been improved in Exchange 2007. In these older versions of Exchange, a site folder exists by the name of Schedule+ Free/Busy that is used to store the calendar free/busy information for each user. You can see this folder in Exchange System Manager by viewing the system folders instead of the public folders. Figure 1 shows an example of the Schedule+ Free/Busy system folders as seen in Exchange System Manager.


Figure 1: The Schedule+ Free/Busy System Folder

You’ll note that there are two of these system folders, one per administrative group. By default, Outlook periodically publishes the calendar free/busy information into the system folder which then allows other users’ Outlook clients to query the data when booking appointments. On smaller systems this is generally fine, although on larger systems the use of public folders as the free/busy storage medium can pose a few problems. For example, there is always the possibility of the lack of up-to-date free/busy information due to public folder replication delays, or, in the worst case, the failure of the public folder replication process for whatever reason. However, the main problem with this approach going forward is the future of public folders in Exchange. Over the last few years, you may have heard or read about Microsoft’s plans to retire public folders from a future version of Exchange and thus a new mechanism is required to handle free/busy requests. That’s where the availability service in Exchange 2007 comes in.

A Better Free/Busy Method

The availability service in Exchange 2007 is one of the new Web services. Briefly speaking, the Exchange 2007 Web services allow applications to access mailbox contents via HTTP, so clearly application development is aimed at these services in Exchange 2007. As we will discuss in detail, the free/busy information for a user hosted on Exchange 2007 is now stored directly in the mailbox, so accessing free/busy information can be achieved via the Web services and thus, specifically, the Availability service. As we shall see, this new method relies on Outlook 2007 and Exchange 2007, so things are not always achieved via this new method if Outlook 2003 and Exchange 2003 are still in the mix. Outlook 2007 locates the Availability service via the Autodiscover service.

This article will not focus specifically on the Autodiscover service as this is a huge topic within itself. However, as a brief piece of background information, it is important to understand what the Autodiscover service is if you do not already understand it. Briefly, the Autodiscover service gives Outlook 2007 clients access to specific Exchange 2007 features such as the Availability service as we have already mentioned, plus other common services such as the Offline Address Book (OAB) as well as less common services such as Unified Messaging (UM). Essentially, Outlook 2007 makes a request to a virtual directory called Autodiscover that is present on a Client Access Server. This Autodiscover service returns to the client many different pieces of information, some of which are URLs for services such as the Availability service.

Version Issues

Different access methods for free/busy information retrieval are used in environments that consist of Outlook 2003 and Outlook 2007 as well as Exchange 2003 and Exchange 2007. For example, when Outlook 2007 is used in conjunction with Exchange 2007, the main improvement is the fact that the free/busy information is now obtained directly from the Exchange 2007 target mailbox rather than from the Schedule+ Free/Busy system folder. This is how free/busy information is much more up-to-date than via the traditional public folder method. Consider Figure 2 below, where an Outlook 2007 user with an Exchange 2007 mailbox requests free busy information for another Exchange 2007 user. In this case, the connection from Outlook is made to the Availability service running on the Client Access Server which in turn determines which mailbox server hosts the target Exchange 2007 mailbox. A Remote Procedure Call (RPC) connection is then made to that mailbox server and the results returned to the Client Access Server before being passed back to the user.


Figure 2: Outlook 2007 User Querying Exchange 2007 Free/Busy Information

Figure 2 above assumes that the Client Access Server and mailbox server are in the same Active Directory site. What if the free/busy request is made for a user whose mailbox resides on an Exchange 2007 mailbox server in a different Active Directory site? In this case, the Client Access Server in the Active Directory site of the user who originates the request will proxy the request to a Client Access Server located in the Active Directory site of the target user. The results are returned to the original Client Access Server and then ultimately passed back to the originating user.

There is another important scenario that must be considered. What if a free/busy request was also made to another mailbox at the same time, but that mailbox was still on an Exchange 2003 server? This situation will be very common during any transition from Exchange 2003 to Exchange 2007. In these cases, the free/busy information for the Exchange 2003 user is stored in the Schedule+ Free/Busy system folder as we’ve already seen in this article. Therefore, the Availability service has to obtain the relevant information from this folder and it does this by making HTTP requests to the /Public virtual directory on the target Exchange 2003 mailbox server. This process is depicted in Figure 3. Once the information has been retrieved from the Exchange 2007 and Exchange 2003 servers, the Availability service combines the results and returns them to the Outlook 2007 user.


Figure 3: Outlook 2007 User Querying Exchange 2003 and Exchange 2007 Free/Busy Information

So far we have covered what happens when a user is running Outlook 2007. How about when the user is running Outlook 2003 but connected to an Exchange 2007 mailbox? In this case, it doesn’t matter whether the target mailbox is on Exchange 2003 or Exchange 2007 as the Outlook 2003 client will attempt to retrieve free/busy information from the Schedule+ Free/Busy system folder. The reason for this is simply that Outlook 2003 always expects to publish the free/busy information in this location and therefore has no knowledge of the Availability service. As you can probably guess, this is also the situation for earlier versions of Outlook, such as Outlook 2002 or Outlook 2000.

Up to this point I’ve only listed Outlook as the client type in use. I should also mention that the principles are the same if you are using Outlook Web Access. In other words, if the target mailbox is on Exchange 2007, the Availability service will make a RPC connection to that mailbox server. If the target mailbox is on Exchange 2003, the Availability service will make HTTP calls and retrieve the information from the Schedule+ Free/Busy system folder.

Summary

The Availability service in Exchange 2007 is important in the fact that it’s responsible for obtaining up-to-date free/busy information for users, providing they are running both Outlook 2007 and Exchange 2007. In this article I’ve covered a high-level introduction to the Exchange 2007 Availability service and how it is used to retrieve this free/busy information.

Saturday, December 20, 2008

Installing Exchange 2007 on Windows Server 2008

In this article I will cover the installation of Exchange 2007 SP1 on Windows Server 2008. I will lay out which versions of Exchange are supported on which OS version and also which domain controller version they can use. I will detail the supported methods to move from Exchange 2007 on Window Server 2003, to Exchange 2007 on Windows Server 2008 and finally I will cover the prerequisites needed, before showing the actual install.

Note:
At this time, neither Windows Server 2008 nor Exchange Server 2007 SP1 have released to manufacturing. As I am therefore working with beta code, certain elements of what follows (in particular the screenshots, may change before the final version.

Introduction
It is nearly a year after the release of Exchange 2007 and many of us now have complete Exchange 2007 implementations. I guess that means we are looking for something new to do! If this is the case then you won’t be disappointed, as very soon we will be presented with the new challenge of moving our existing Exchange 2007 systems onto Windows Server 2008.

Table 1 lists the various supported scenarios for Exchange and OS versions.


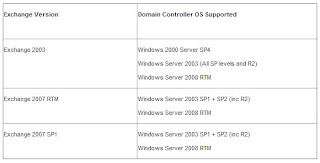
Table 1: Exchange/OS versions supported for install

The first thing to note is that Exchange 2007 RTM is not supported on Windows Server 2008. To install Exchange 2007 on Server 2008 you must run Exchange 2007 SP1. This service pack, as many of you may know, is a little different from previous service packs in that it is a complete installation of Exchange. Effectively SP1 is RTM with the SP1 code slipstreamed into it. Having established that Exchange 2007 SP1 is required to install on Server 2008, what other considerations are there?

Probably the biggest consideration is Active Directory. Table 2 sets out the different Domain Controller versions supported by different versions of Exchange.


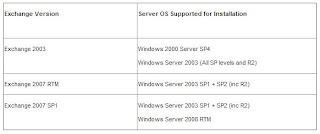
Table 2: The Exchange/Domain Controller support matrix

One new Active Directory feature of Windows Server 2008 which I haven’t mentioned is Read Only Domain Controllers (RODC) (and Global Catalog servers). These are servers which do not hold a writable copy of the AD and also do not hold account passwords. They are most likely to be used in branch office scenarios to prevent security breaches either intentional or accidental. So how do these RODCs affect Exchange? Simply put, Exchange doesn’t use them! When left to automatically associate with a domain controller (or global catalog server) Exchange will ignore the RODC or ROGC. The important thing for administrators to remember is not to manually set Exchange to work with a RODC as things simply will not work correctly.

One other area that will be welcome to administrators is that with the release of Exchange 2007 SP1, the Exchange Management Console will finally be supported on Windows Vista, and for that matter on Server 2008 as well.

Before moving on to how we upgrade, I think it is worth clarifying that Exchange 2007 SP1 will not install on Windows Server 2008 Server Core. Server Core, for those who haven’t heard, is a cut down version of Windows Server 2008 which only presents a command line interface. It has been stripped down to run various server roles including amongst others Domain Controller, DHCP, DNS, File and Print. However, because a lot of functionality has been stripped out to ensure a small footprint and less need for patching, important components such as the .Net Framework are not present to support Exchange.

Note:
As I mentioned we are currently working with beta code. It is because of this that the Unified Messaging role does not currently install on Server 2008. This will be rectified before release.

The upgrade path
So how do you actually get from Exchange 2007 running on Windows Server 2003 to Exchange 2007 SP1 running on Windows Server 2008?

Unfortunately, although understandably given the massive architecture changes involved, you cannot simply upgrade Exchange 2007 to Exchange 2007 SP1 and then upgrade the OS to Windows Server 2008. This simply breaks Exchange completely!

Even when you have a clustered mailbox server, you cannot perform a rolling upgrade by upgrading one node of the cluster failing over and then doing the other node.

The only way is to perform a migration! In other words you must do a clean install of Windows Server 2008 on a new server and then migrate your data. Mailboxes can be moved using the Move-Mailbox cmdlet and public folder data must be replicated.

This has caused a fair amount of discontent on various online forums but it is the only way!

Installation
Having looked at all the background, let’s get started with the installation. The first thing to cover is preparing your Windows Server 2008 machine for Exchange 2007. There are a bunch of prerequisites which must be met as listed below:

.Net Framework v2.0 or 3.0
PowerShell RTM
MMC 3.0 (installed by default)
IIS 7 (Various components needed by different roles)
For a much more detailed look at the requirements for each Exchange server role see Exchange 2007 System Requirements.

For now we are going to install an Exchange 2007 SP1 server in a new domain and new organisation. We will install the CAS, HT and Mailbox roles. In order to install the prerequisites we will run the following commands one after the other at a command prompt:

ServerManagerCmd -i RSAT-ADDS

ServerManagerCmd -i PowerShell

ServerManagerCmd -i Web-Server

ServerManagerCmd -i Web-ISAPI-Ext

ServerManagerCmd -i Web-Metabase

ServerManagerCmd -i Web-Lgcy-Mgmt-Console

ServerManagerCmd -i Web-Basic-Auth

ServerManagerCmd -i Web-Digest-Auth

ServerManagerCmd -i Web-Windows-Auth

ServerManagerCmd -i Web-Dyn-Compression

After the first command (RSAT-ADDS) you will need to reboot as shown in Figure 1.


Figure 1: Installing Active Directory Management Tools and being prompted to reboot

After the reboot, I used a simple batch file to run the other commands in sequence. Part of the output from the commands is shown in Figure 2.


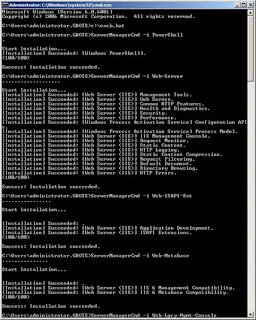
Figure 2: Part of the output from the prerequisite installation

For more detailed information about the Windows Server 2008 roles/features required for the other Exchange 2007 roles (Edge Transport Server and Unified Messaging Server) see How to Install Exchange 2007 SP1 Prerequisites on Windows Server 2008.

Having successfully completed the installation of prerequisites, it is time to install Exchange. Start setup and click “Install Microsoft Exchange Server 2007 SP1” as shown in Figure 3.


Figure 3: Starting Setup of Exchange Server 2007 SP1

Next run through the usual setup steps as shown in Figures 4 – 11.


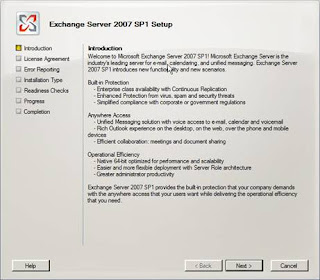
Figure 4: The SP1 Setup introduction screen


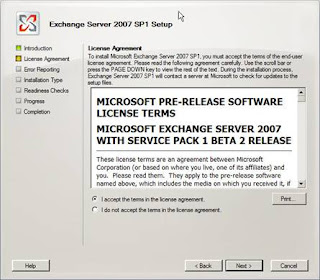
Figure 5: Accepting the license agreement


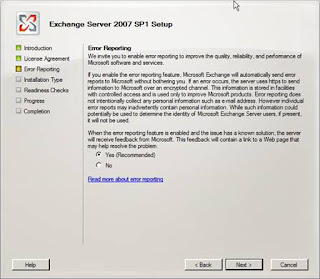
Figure 6: Opting into the Microsoft Error Reporting scheme


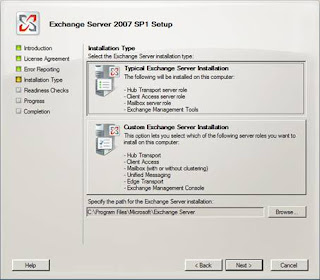
Figure 7: Selecting a typical install which installs CAS, HT, Mailbox roles and the management tools


Figure 8: Setting the new Exchange Organisation name


Figure 9: Opting not to create public folders for legacy clients


Figure 10: Exchange Readiness checks in progress


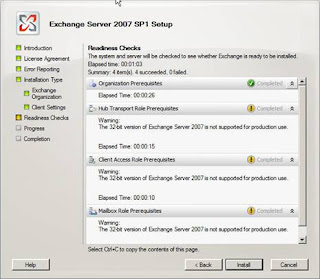
Figure 11: The not for production use warning before install about using a 32 bit version of Exchange 2007

Having completed the steps in Figures 3-11 installation begins. However, it is at this point that an error occurs as shown in Figure 12. It would appear that for whatever reason, the registry key “HKLM\SOFTWARE\Microsoft\Windows\Windows Error Reporting\Consent” does not exist!


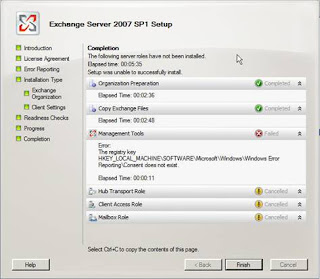
Figure 12: The registry key doesn’t exist error message

Note:
It is highly unlikely that this problem will still exist once the products ship.

To rectify this problem locate the relevant area in the registry and create the required key as shown in Figure 13.


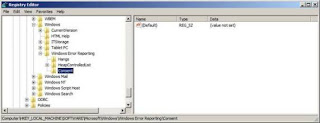
Figure 13: The newly created registry key

Having resolved the problem with the registry key you are left with no other option than to exit setup. On doing this you will be prompted to reboot, which you should do.

When the server is backed up, restart setup which will start in Exchange Maintenance Mode as shown in Figure 14.


Figure 14: Exchange setup restarting in Maintenance Mode

At this point, step through the remaining setup screens as shown in Figures 15-17.


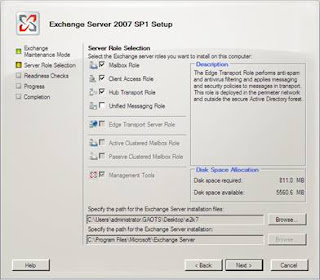
Figure 15: Selecting the relevant roles for installation


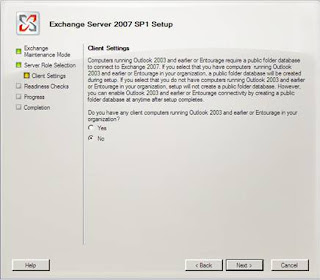
Figure 16: Again making the choice not to create public folders for legacy clients


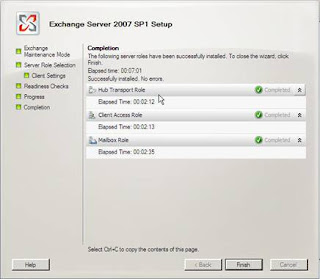
Figure 17: Setup completed!

Once setup completes you will have a working Exchange 2007 SP1 install on Windows Server 2008 as shown in Figure 18.


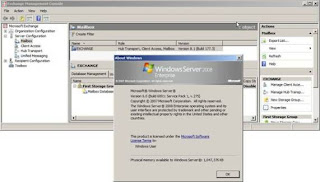
Figure 18: Exchange 2007 SP1 installed on Windows Server 2008

Before completing this article I thought it might be interesting to show the registry key that we created earlier. As can be seen in Figure 19, it is now populated with various values.


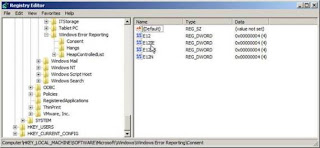
Figure 19: The values in the registry key created to solve the installation error

Summary
As you can see from the steps above, the install process to put Exchange 2007 on Windows Server 2008 is basically very simple. At this time there is the odd glitch but there is no doubt these will be ironed out before Release to Manufacturing. I feel the only thing that has the potential to cause a delay in deployment are the usual worries about deploying a brand new OS and the fact that if you already have Exchange 2007 on Server 2003 you will have to perform a migration which requires extra hardware.