Thursday, December 25, 2008

Implementing Captcha Validation with OWA 2007 and Forms-Based Authentication

A while back, I wrote an article describing how to add a CAPTCHA image and text input field to the Outlook Web Access 2003 Forms-based Authentication logon form. Now that Exchange 2007 is established in the marketplace, I have received a number of requests for an updated article describing how to do the same for Exchange 2007. While the procedure is mostly similar to the OWA 2003 version, there are several important differences in the detail.

CAPTCHA stands for Completely Automated Public Turing test to tell Computers and Humans Apart. You will no doubt have seen this implemented in various web pages as an image of a visually distorted common word, which must be typed into an input field, thus proving that you are indeed a real person. This has become necessary to prevent the actions of bots, which roam the web looking for opportunities to inject spam into message boards, etc. Shown here in Figure 1 is an example of such an image. The idea is that a human user will recognize the word 'part', whereas a spambot will not.


Figure 1: A CAPTCHA image displaying the word 'part'

OWA Forms-based Authentication is very secure by itself, of course, since you still need to supply valid credentials to log in, but there is still a significant amount of interest in adding CAPTCHA validation to it. Here, I will show how it can be done by modifying Exchange's logon.aspx file. I have chosen to use a freely available CAPTCHA script written by Jonathan Feaster, which is available for download from Archreality . This script uses JavaScript, and unlike some other solutions has the advantage of not requiring a second .aspx page to process the form input; the validation is done by the user's browser before the credentials are sent to the OWA server. Any CAPTCHA scripts which require a second page will not work with FBA, since there is no opportunity to insert anything between the logon page and the OWA GUI.

Procedure

First, extract the files to a suitable place on the server. There are two .js files, and a folder named cimg, which contains the word images to be displayed on the logon page. Place the entire extracted jcap folder in the C:\Program Files\Microsoft\Exchange Server\ClientAccess\Owa\auth folder as shown in figure 2:


Figure 2: The extracted jcap files in the auth folder

Next, use Explorer to locate the logon.aspx file that creates the FBA logon page. This is inside the same auth folder that you just placed the jcap folder into. Before doing anything else, make a backup copy of the logon.aspx file. Right-click it, then select Copy, then right-click the folder, and then select Paste. This creates a copy of your logon.aspx file named 'Copy of logon.aspx' . If your modifications are unsuccessful, you will need to revert to this original file to restore FBA functionality. Now, open the logon.aspx using Notepad. I'm going to insert the image just above the 'Public Computer' radio button, so press F3 and search for the text rdoPblc . Assuming that you successfully found the text, insert the following just before the preceding tag:


Enter the code as it is shown below


The result should look something like figure 3:


Figure 3: The amended contents of logon.aspx in Notepad

Next, press CTRL-HOME to go back to the top of the file, and then press CTRL-F, and search for the text

onsubmit="return doJcap();"

This part of the page should now look like that shown in figure 4:


Figure 4: The modified tag

Now save the file back to disk, and close Notepad. All that is required now is a small change to the jcap.js file that was saved in C:\Program Files\Microsoft\Exchange Server\ClientAccess\Owa\auth\jcap . Right-click the jcap.js file, and select Edit. It should open in Notepad. On the line that begins with var imgdir, you need to change the path to point to the current location of the cimg folder. Change it so that the beginning of the line looks like this:

var imgdir = "/owa/auth/jcap/cimg/";

The complete line looks like this:


Figure 5: Defining the path to the image files

Save the file, and we're finished. The next time you open the FBA logon page, it should look something like this (figure 6). Also shown is the alert message displayed if the typed text does not match the distorted text in the image when you click the Log On button.


Figure 6: The modified FBA logon page

Please remember that due to updates made by Exchange service packs and patches, future versions of the logon.aspx file may be different to the version shown. The basic principles described should, however, remain the same.

Exchange 2007 Availability Services

I do not know about you, but when I think of the Client Access Server role in Exchange 2007, I immediately think of Outlook Web Access, Outlook Anywhere, ActiveSync and other non-MAPI forms of connectivity to the mailbox server. However, the Client Access Server role is also home to other important services such as the Autodiscover and Availability services. These are vital services in the Exchange 2007 infrastructure and in this article we will be taking an introductory and thus high-level look at the Availability service and what its main role is.

What is The Availability Service?

The availability service in Exchange 2007 is largely concerned with how users access the free/busy information of other users. Before we get into the detail of this service, it’s important to review how the free/busy information is stored and accessed in Exchange 2000 and Exchange 2003 so that we can draw comparisons on how the process works in these older versions of Exchange and more importantly what has been improved in Exchange 2007. In these older versions of Exchange, a site folder exists by the name of Schedule+ Free/Busy that is used to store the calendar free/busy information for each user. You can see this folder in Exchange System Manager by viewing the system folders instead of the public folders. Figure 1 shows an example of the Schedule+ Free/Busy system folders as seen in Exchange System Manager.


Figure 1: The Schedule+ Free/Busy System Folder

You’ll note that there are two of these system folders, one per administrative group. By default, Outlook periodically publishes the calendar free/busy information into the system folder which then allows other users’ Outlook clients to query the data when booking appointments. On smaller systems this is generally fine, although on larger systems the use of public folders as the free/busy storage medium can pose a few problems. For example, there is always the possibility of the lack of up-to-date free/busy information due to public folder replication delays, or, in the worst case, the failure of the public folder replication process for whatever reason. However, the main problem with this approach going forward is the future of public folders in Exchange. Over the last few years, you may have heard or read about Microsoft’s plans to retire public folders from a future version of Exchange and thus a new mechanism is required to handle free/busy requests. That’s where the availability service in Exchange 2007 comes in.

A Better Free/Busy Method

The availability service in Exchange 2007 is one of the new Web services. Briefly speaking, the Exchange 2007 Web services allow applications to access mailbox contents via HTTP, so clearly application development is aimed at these services in Exchange 2007. As we will discuss in detail, the free/busy information for a user hosted on Exchange 2007 is now stored directly in the mailbox, so accessing free/busy information can be achieved via the Web services and thus, specifically, the Availability service. As we shall see, this new method relies on Outlook 2007 and Exchange 2007, so things are not always achieved via this new method if Outlook 2003 and Exchange 2003 are still in the mix. Outlook 2007 locates the Availability service via the Autodiscover service.

This article will not focus specifically on the Autodiscover service as this is a huge topic within itself. However, as a brief piece of background information, it is important to understand what the Autodiscover service is if you do not already understand it. Briefly, the Autodiscover service gives Outlook 2007 clients access to specific Exchange 2007 features such as the Availability service as we have already mentioned, plus other common services such as the Offline Address Book (OAB) as well as less common services such as Unified Messaging (UM). Essentially, Outlook 2007 makes a request to a virtual directory called Autodiscover that is present on a Client Access Server. This Autodiscover service returns to the client many different pieces of information, some of which are URLs for services such as the Availability service.

Version Issues

Different access methods for free/busy information retrieval are used in environments that consist of Outlook 2003 and Outlook 2007 as well as Exchange 2003 and Exchange 2007. For example, when Outlook 2007 is used in conjunction with Exchange 2007, the main improvement is the fact that the free/busy information is now obtained directly from the Exchange 2007 target mailbox rather than from the Schedule+ Free/Busy system folder. This is how free/busy information is much more up-to-date than via the traditional public folder method. Consider Figure 2 below, where an Outlook 2007 user with an Exchange 2007 mailbox requests free busy information for another Exchange 2007 user. In this case, the connection from Outlook is made to the Availability service running on the Client Access Server which in turn determines which mailbox server hosts the target Exchange 2007 mailbox. A Remote Procedure Call (RPC) connection is then made to that mailbox server and the results returned to the Client Access Server before being passed back to the user.


Figure 2: Outlook 2007 User Querying Exchange 2007 Free/Busy Information

Figure 2 above assumes that the Client Access Server and mailbox server are in the same Active Directory site. What if the free/busy request is made for a user whose mailbox resides on an Exchange 2007 mailbox server in a different Active Directory site? In this case, the Client Access Server in the Active Directory site of the user who originates the request will proxy the request to a Client Access Server located in the Active Directory site of the target user. The results are returned to the original Client Access Server and then ultimately passed back to the originating user.

There is another important scenario that must be considered. What if a free/busy request was also made to another mailbox at the same time, but that mailbox was still on an Exchange 2003 server? This situation will be very common during any transition from Exchange 2003 to Exchange 2007. In these cases, the free/busy information for the Exchange 2003 user is stored in the Schedule+ Free/Busy system folder as we’ve already seen in this article. Therefore, the Availability service has to obtain the relevant information from this folder and it does this by making HTTP requests to the /Public virtual directory on the target Exchange 2003 mailbox server. This process is depicted in Figure 3. Once the information has been retrieved from the Exchange 2007 and Exchange 2003 servers, the Availability service combines the results and returns them to the Outlook 2007 user.


Figure 3: Outlook 2007 User Querying Exchange 2003 and Exchange 2007 Free/Busy Information

So far we have covered what happens when a user is running Outlook 2007. How about when the user is running Outlook 2003 but connected to an Exchange 2007 mailbox? In this case, it doesn’t matter whether the target mailbox is on Exchange 2003 or Exchange 2007 as the Outlook 2003 client will attempt to retrieve free/busy information from the Schedule+ Free/Busy system folder. The reason for this is simply that Outlook 2003 always expects to publish the free/busy information in this location and therefore has no knowledge of the Availability service. As you can probably guess, this is also the situation for earlier versions of Outlook, such as Outlook 2002 or Outlook 2000.

Up to this point I’ve only listed Outlook as the client type in use. I should also mention that the principles are the same if you are using Outlook Web Access. In other words, if the target mailbox is on Exchange 2007, the Availability service will make a RPC connection to that mailbox server. If the target mailbox is on Exchange 2003, the Availability service will make HTTP calls and retrieve the information from the Schedule+ Free/Busy system folder.

Summary

The Availability service in Exchange 2007 is important in the fact that it’s responsible for obtaining up-to-date free/busy information for users, providing they are running both Outlook 2007 and Exchange 2007. In this article I’ve covered a high-level introduction to the Exchange 2007 Availability service and how it is used to retrieve this free/busy information.

Saturday, December 20, 2008

Installing Exchange 2007 on Windows Server 2008

In this article I will cover the installation of Exchange 2007 SP1 on Windows Server 2008. I will lay out which versions of Exchange are supported on which OS version and also which domain controller version they can use. I will detail the supported methods to move from Exchange 2007 on Window Server 2003, to Exchange 2007 on Windows Server 2008 and finally I will cover the prerequisites needed, before showing the actual install.

Note:
At this time, neither Windows Server 2008 nor Exchange Server 2007 SP1 have released to manufacturing. As I am therefore working with beta code, certain elements of what follows (in particular the screenshots, may change before the final version.

Introduction
It is nearly a year after the release of Exchange 2007 and many of us now have complete Exchange 2007 implementations. I guess that means we are looking for something new to do! If this is the case then you won’t be disappointed, as very soon we will be presented with the new challenge of moving our existing Exchange 2007 systems onto Windows Server 2008.

Table 1 lists the various supported scenarios for Exchange and OS versions.
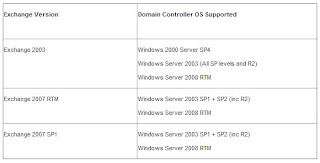


Table 1: Exchange/OS versions supported for install

The first thing to note is that Exchange 2007 RTM is not supported on Windows Server 2008. To install Exchange 2007 on Server 2008 you must run Exchange 2007 SP1. This service pack, as many of you may know, is a little different from previous service packs in that it is a complete installation of Exchange. Effectively SP1 is RTM with the SP1 code slipstreamed into it. Having established that Exchange 2007 SP1 is required to install on Server 2008, what other considerations are there?

Probably the biggest consideration is Active Directory. Table 2 sets out the different Domain Controller versions supported by different versions of Exchange.
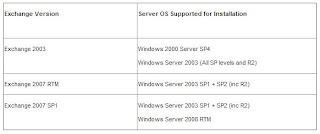


Table 2: The Exchange/Domain Controller support matrix

One new Active Directory feature of Windows Server 2008 which I haven’t mentioned is Read Only Domain Controllers (RODC) (and Global Catalog servers). These are servers which do not hold a writable copy of the AD and also do not hold account passwords. They are most likely to be used in branch office scenarios to prevent security breaches either intentional or accidental. So how do these RODCs affect Exchange? Simply put, Exchange doesn’t use them! When left to automatically associate with a domain controller (or global catalog server) Exchange will ignore the RODC or ROGC. The important thing for administrators to remember is not to manually set Exchange to work with a RODC as things simply will not work correctly.

One other area that will be welcome to administrators is that with the release of Exchange 2007 SP1, the Exchange Management Console will finally be supported on Windows Vista, and for that matter on Server 2008 as well.

Before moving on to how we upgrade, I think it is worth clarifying that Exchange 2007 SP1 will not install on Windows Server 2008 Server Core. Server Core, for those who haven’t heard, is a cut down version of Windows Server 2008 which only presents a command line interface. It has been stripped down to run various server roles including amongst others Domain Controller, DHCP, DNS, File and Print. However, because a lot of functionality has been stripped out to ensure a small footprint and less need for patching, important components such as the .Net Framework are not present to support Exchange.

Note:
As I mentioned we are currently working with beta code. It is because of this that the Unified Messaging role does not currently install on Server 2008. This will be rectified before release.

The upgrade path
So how do you actually get from Exchange 2007 running on Windows Server 2003 to Exchange 2007 SP1 running on Windows Server 2008?

Unfortunately, although understandably given the massive architecture changes involved, you cannot simply upgrade Exchange 2007 to Exchange 2007 SP1 and then upgrade the OS to Windows Server 2008. This simply breaks Exchange completely!

Even when you have a clustered mailbox server, you cannot perform a rolling upgrade by upgrading one node of the cluster failing over and then doing the other node.

The only way is to perform a migration! In other words you must do a clean install of Windows Server 2008 on a new server and then migrate your data. Mailboxes can be moved using the Move-Mailbox cmdlet and public folder data must be replicated.

This has caused a fair amount of discontent on various online forums but it is the only way!

Installation
Having looked at all the background, let’s get started with the installation. The first thing to cover is preparing your Windows Server 2008 machine for Exchange 2007. There are a bunch of prerequisites which must be met as listed below:

.Net Framework v2.0 or 3.0
PowerShell RTM
MMC 3.0 (installed by default)
IIS 7 (Various components needed by different roles)
For a much more detailed look at the requirements for each Exchange server role see Exchange 2007 System Requirements.

For now we are going to install an Exchange 2007 SP1 server in a new domain and new organisation. We will install the CAS, HT and Mailbox roles. In order to install the prerequisites we will run the following commands one after the other at a command prompt:

ServerManagerCmd -i RSAT-ADDS

ServerManagerCmd -i PowerShell

ServerManagerCmd -i Web-Server

ServerManagerCmd -i Web-ISAPI-Ext

ServerManagerCmd -i Web-Metabase

ServerManagerCmd -i Web-Lgcy-Mgmt-Console

ServerManagerCmd -i Web-Basic-Auth

ServerManagerCmd -i Web-Digest-Auth

ServerManagerCmd -i Web-Windows-Auth

ServerManagerCmd -i Web-Dyn-Compression

After the first command (RSAT-ADDS) you will need to reboot as shown in Figure 1.
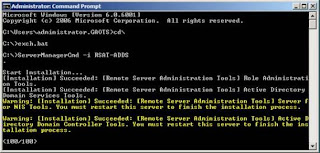


Figure 1: Installing Active Directory Management Tools and being prompted to reboot

After the reboot, I used a simple batch file to run the other commands in sequence. Part of the output from the commands is shown in Figure 2.
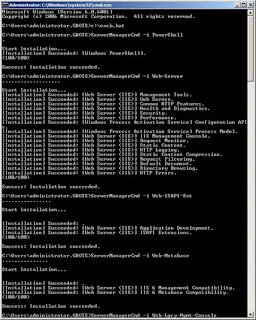


Figure 2: Part of the output from the prerequisite installation

For more detailed information about the Windows Server 2008 roles/features required for the other Exchange 2007 roles (Edge Transport Server and Unified Messaging Server) see How to Install Exchange 2007 SP1 Prerequisites on Windows Server 2008.

Having successfully completed the installation of prerequisites, it is time to install Exchange. Start setup and click “Install Microsoft Exchange Server 2007 SP1” as shown in Figure 3.
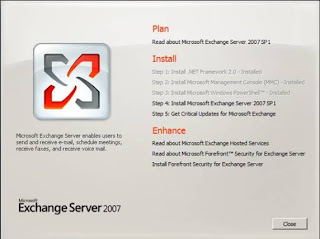


Figure 3: Starting Setup of Exchange Server 2007 SP1

Next run through the usual setup steps as shown in Figures 4 – 11.
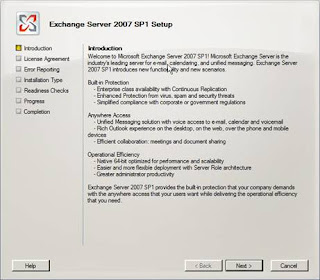


Figure 4: The SP1 Setup introduction screen
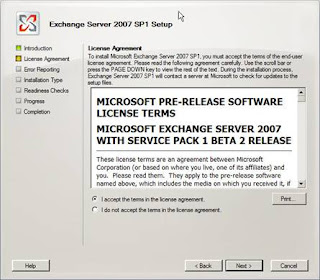


Figure 5: Accepting the license agreement
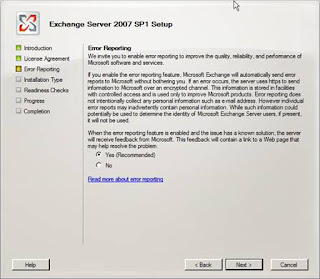


Figure 6: Opting into the Microsoft Error Reporting scheme
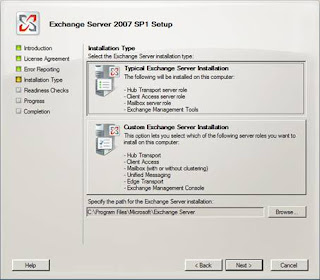


Figure 7: Selecting a typical install which installs CAS, HT, Mailbox roles and the management tools
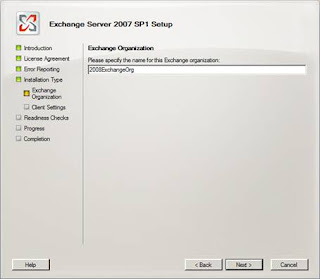


Figure 8: Setting the new Exchange Organisation name
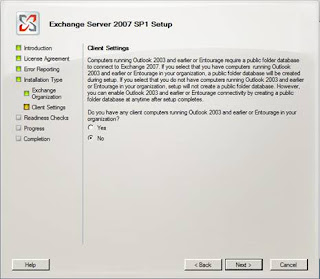


Figure 9: Opting not to create public folders for legacy clients


Figure 10: Exchange Readiness checks in progress
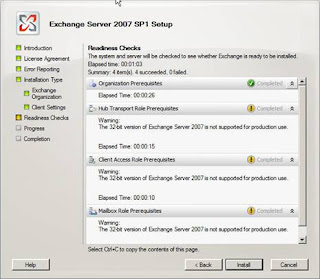


Figure 11: The not for production use warning before install about using a 32 bit version of Exchange 2007

Having completed the steps in Figures 3-11 installation begins. However, it is at this point that an error occurs as shown in Figure 12. It would appear that for whatever reason, the registry key “HKLM\SOFTWARE\Microsoft\Windows\Windows Error Reporting\Consent” does not exist!
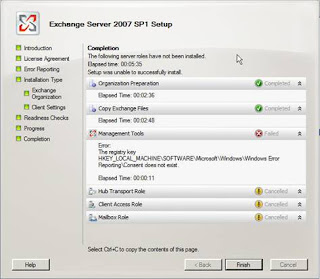


Figure 12: The registry key doesn’t exist error message

Note:
It is highly unlikely that this problem will still exist once the products ship.

To rectify this problem locate the relevant area in the registry and create the required key as shown in Figure 13.
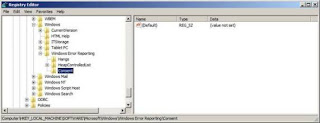


Figure 13: The newly created registry key

Having resolved the problem with the registry key you are left with no other option than to exit setup. On doing this you will be prompted to reboot, which you should do.

When the server is backed up, restart setup which will start in Exchange Maintenance Mode as shown in Figure 14.
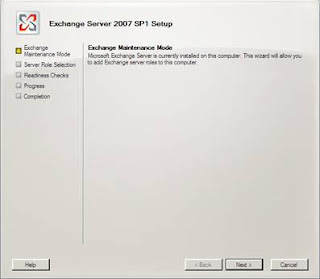


Figure 14: Exchange setup restarting in Maintenance Mode

At this point, step through the remaining setup screens as shown in Figures 15-17.
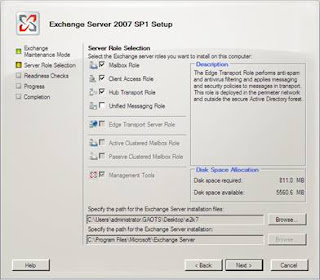


Figure 15: Selecting the relevant roles for installation
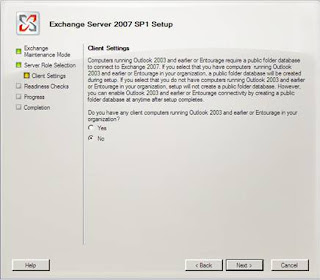


Figure 16: Again making the choice not to create public folders for legacy clients
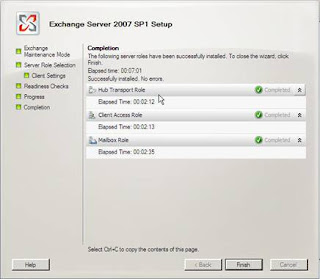


Figure 17: Setup completed!

Once setup completes you will have a working Exchange 2007 SP1 install on Windows Server 2008 as shown in Figure 18.
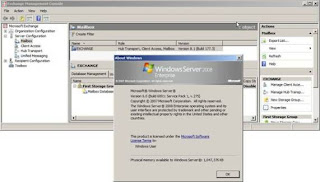


Figure 18: Exchange 2007 SP1 installed on Windows Server 2008

Before completing this article I thought it might be interesting to show the registry key that we created earlier. As can be seen in Figure 19, it is now populated with various values.
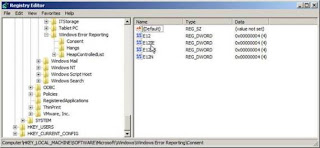


Figure 19: The values in the registry key created to solve the installation error

Summary
As you can see from the steps above, the install process to put Exchange 2007 on Windows Server 2008 is basically very simple. At this time there is the odd glitch but there is no doubt these will be ironed out before Release to Manufacturing. I feel the only thing that has the potential to cause a delay in deployment are the usual worries about deploying a brand new OS and the fact that if you already have Exchange 2007 on Server 2003 you will have to perform a migration which requires extra hardware.

Managing Receive Connectors (Part 2)

In the last article we created a Receive Connector to receive mail coming from the Internet, and we also tested it using the telnet utility.

In order to test a receive connector we have to be aware of the basic SMTP verbs to send a message using a telnet session. These following commands will enable you to send a test message using the telnet utility. All the basic SMTP verbs required to send a message are below:

The receive connectors that we have just created is listening on port 25 and on a specific IP address. Let’s use the telnet utility to connect in our server:

telnet 25
Expected result: 220 Banner information
Start the SMTP communication.

EHLO example.org

Expected result: a list of all SMTP verbs that are accepted by the receive connector. In the first line a hello answer with the IP Address used by the sender will be shown.
Define the sender of the test message.

Mail from:user@example.org

Expected result: 250 2.1.0 Sender OK

Define the recipient of this test message. The SMTP domain used by the recipient must exist in the current organization.

Rcpt to:user@

Expected result: 250 2.1.5 Recipient OK

Start the test message.

Data

Expected result: 354 Start mail input; end with .

Hit the key twice and type in the content that will appear in the body of the test message. To finish type a period “.” in a blank line and hit .

This is a test message.

.

Expected result: 250 2.6.0 Queued mail for delivery

Closing the session.

Quit

Expected result: 221 2.0.0 Service closing transmission channel

We can log on to OWA to check if the message was received. The entire process can be seen in Figure 01.


Figure 01

Knowing this process is important to troubleshooting mail flow and to validate a Receive Connector as well.

Playing with Receive Connector security features...

Now that we have just configured a Receive Connector using both the Exchange Management Console and Exchange Management Shell we can start playing with some security configurations for our Receive Connectors. All the security that we are going to see here is modified by the Receive Connector and they must be configured using the Exchange Management Shell. Let’s configure some features in our new Internet Receive Connector, as follows:

Changing Banner information…

Some companies do not like the idea of displaying the server name in SMTP connections. We can change the banner information used by a Receive Connector using the cmdlet below and the result will be shown in Figure 02.

Set-ReceiveConnector -Banner “220 Mail Server”


Figure 02

If you still have Exchange Server 2003/2000 and you want to change this behavior you can use the following Microsoft KB Article: How to change the default connection response that you receive after you connect to the SMTP port in Exchange 2003.

Specifying a number of errors during a session…
We can control the number of protocol errors in a single session. The default value is 5, to configure it to 2 we can use the following cmdlet:

Set-ReceiveConnector -MaxProtocolErrors 2

Now if an SMTP Server/user connects and reaches the maximum number of errors defined in the receive connector the following message will be shown (Figure 03):


Figure 03

Throttling a Receive Connector…
Receive connectors allow us to restrict inbound traffic to prevent high usage from a determined source, preventing an unnecessary overload of the system. Here are the three options that we have:

MaxInboundConnectionsperSource: Defines the maximum number of connections made in the receive connector at the same time by the same source. This default value of this setting is 100.
MaxInboundConnection: Defines how many connections the receive connector will accept at the same time. The default value of this setting is 5000.
MaxInboundConnectionPercentagePersource: Based on the MaxInboundConnection value it indicates how many connections the same source can establish with the receive connector. The default value is 2%.
To configure the Receive Connector using the new settings that we have just seen, we can run the following cmdlet:

Set-ReceiveConnector -MaxInboundConnection -MaxInboundConnectionsperSource -MaxInboundConnectionPercentagePerSource

We can also configure time-out in a receive connector in certain aspects, such as: during SMTP communication and also during an inactive connection .To configure the ConnectionTimeout we can run this following cmdlet:

Set-ReceiveConnector -ConnectionTimeout

To disconnect due to Inactive time, we can use the cmdlet below:

Set-ReceiveConnector -ConnectionInactiveTimeout

We can also restrict the number of recipients, Rate Limit and Max message size at connector level, to configure these settings we can use the following parameters:

MaxRecipientsPerMessage: The maximum number of recipients in a single message, the default value is 200.
MaxMessageSize: The maximum size of a message; the default value is 10MB.
MaxRateLimit: This specifies the maximum number of messages that can be sent by the same client per minute.
Let’s change our Internet Receive connector to accept 100 users maximum, the message size should be more than 2MB and the rate limit is 200, as follows:

Set-ReceiveConnector –MaxRecipientsPerMessage:100 –MaxMessageSize:5MB –MaxRateLimit:200

The last feature we will cover in this article is the TarpitIntervall. In Exchange Server 2003 we have to configure it through the Registry Editor (http://support.microsoft.com/kb/842851). In Exchange Server 2007 we can do that using the Exchange Management Shell. The tarpit feature inserts a pre-defined delay in each SMTP response that contains the 5.x.x error code during the SMTP communication between servers. The tarpit feature is only applied to anonymous connections and it should be used with the Recipient Filter Agent and Recipient Lookup features enabled.

In this article we are using a single Exchange Server 2007 box with all three main roles installed (Mailbox, CAS and Hub Transport) and it is receiving messages from the Internet, we also configured the Anti-spam agents on that box (we can validate how to configure a single Exchange Server to receive internet messages and anti-spam features in this article: Configuring Mail Flow in a Single Exchange Server 2007). Let’s look at the Recipient Filtering agent and enable the Recipient Lookup feature:

Open the Exchange Management Console.
Expand Organization Configuration.
Click on Hub Transport.
Click the Anti-Spam Tab.
Double click Recipient Filtering.
Click the Blocked Recipients tab.
Check the first option “Block messages sent to recipients not listed in the Global Address list” (Figure 04).


Figure 04

Okay, from now on all messages addressed to unknown address in our organization will be refused by the Exchange Server, as shown in the first rcpt to: SMTP verb in Figure 05. However we might encounter a problem where a spammer can try a harvest attack against our Exchange Server using a dictionary attack to find out which e-mails are valid in your organization. So, how can we stop it? There is no way to stop it but for each wrong address tried in the SMTP communication a “5.1.1 User unknown” error is displayed and for each of these errors we can configure tarpit to delay the server response.


Figure 05

The default value is 5 seconds, to change this configuration we can run the following cmdlet:

Set-ReceiveConnector “” –TarPitInterval:

Conclusion
In this article we have gone over how to configure some security settings and limits in a Receive Connector. We also saw that the some configuration must be done using the Exchange Management Shell. In the next article we are going to play with logging information and start playing with authentication methods and how to configure permissions using AdsiEdit.msc and the Exchange Management Shell.

Thursday, December 18, 2008

Managing Exchange Server 2007 Receive Connectors (Part 1)

Introduction

Exchange Server 2003 uses the SMTP Virtual Server that comes with the Operation System to control message flow. In Exchange Server 2007 the SMTP service bits are installed within the Exchange Server 2007 installation process. Because of this, we have two different components when we are talking about SMTP traffic in the Exchange 2007 architecture: the receive connectors and the send connectors. They are configured in two different places, the Send Connector is configured at Organization level and the receive connector at Server level. The receive connector is responsible for all SMTP incoming traffic which can originate from an external source, a client, a partner, or another Exchange Server and on top of that the receive connector uses authentication and some other features to manage all received connections.

By default Exchange Server 2007 has two new receive Connectors called Client Receive Connector and Default , where is the Netbios name of the Exchange Server. The default Receive connectors can be found under Server Configuration / Hub item using the Exchange Management Console, as shown in Figure 01. They can also be found using the Get-ReceiveConnector cmdlet through the Exchange Management Shell. By default any new Exchange Server can receive messages from other Hub Transport servers due the Default Receive connector which is named Default and is configured to receive traffic from any host, to any local IP address on port 25 but this traffic must be authenticated first.


Now we are going to create a new Receive Connector from scratch and during the process we will explain the available options that can be defined during the wizard. The server used in this article has two IP addresses: 172.16.171.11 and 172.16.171.12.

Each connector has a unique set of the following attributes: IP Address, Port number and remote IP Address range. These parameters are always validated during the New Receive Connector wizard. If you have an existent connector with the same values a new connector cannot be created.

In this article we are going to create an Internet Receive Connector using the second IP address of the server, as follows:

-Open the Exchange Management Console.

-Expand Server Configuration.

-Click on Hub Transport.

-Select the server name on the right hand side.

-In the Toolbox Actions. Click on New Receive Connector.

-Introduction. Let’s name this new connector using the Name field, and we can also select which kind of connector it is for (Figure 02). We have five options: Internet, Internal, Partner, Client and Custom and each one of them defines a set of authentication and permissions on the connector that we are creating. The choice of connector also changes the New Receive Connector wizard, so it is not the same wizard for all types of pre-configured connectors. In this article we are going to start playing with an Internet Receive Connector, so let’s click on Internet and click on Next.

Note:
If we choose a wrong type of connector we can always change the configuration afterwards. It is not necessary to recreate it due to choosing the incorrect option.


Figure 02

Okay, what if we had chosen Client, Partner or Internal instead of Internet? What would be the difference? The following table shows which changes will be applied for each type of receive connector chosen. We have three columns, the first one (During Wizard) shows which information will be required during the New Receive Connector Wizard; the second one (Authentication) shows what authentication method will be configured by default in the new Receive Connector and the last one (Permissions) shows which groups are marked in the Receive Connector permissions. Remember that all those values can be changed through the Exchange Management Console or Exchange Management Shell afterwards.


We will go over Authentication and Permissions later on in this article series, for now let’s finish our Internet Receive Connector.

Local Network Settings. Let’s use only the second IP address of the local server on port 25. We are also going to use the mail.andersonpatricio.org as FQDN, as shown in Figure 03. This name will be displayed when a connection is established with this Receive Connector. Click on Next.


Figure 03

New Connector. A summary of our choices made so far. Click on New to create the Receive Connector.
Completion. Final screen of the new receive connector wizard with all the information provided during the wizard and the cmdlet used to create it. Click on Finish.

Okay, these are the steps required to create a new receive connector; we can do the same using the Exchange Management Shell. To create we have to use the New-ReceiveConnector cmdlet. In this example we are going to create the same connector described in the steps above:

New-ReceiveConnector -Name “Connector Name” –Usage:Internet –Bindings:: -fqdn: ‘’ –Server

Testing the new Receive connector…

Okay, we have just created our new connector. We can start testing it using the following command: telnet 172.16.171.12 25 where 25 is the port that will be used (Figure 04). The connection will be made and the FQDN name that we defined in our new Receive Connector will be shown. If we try to connect using the IP address 172.16.171.11 we will receive a different prompt because it is a different connector. Our Internet connector is only listening on the 172.16.171.12 IP address.


Figure 04

Conclusion
In this article we have seen how to create a receive connector and we also saw that a Receive Connector must be unique in at least one of these attributes: IP Address, port, Remote IP Address, in order to be created. In the following article we are going to use the telnet utility to test a Receive Connector and also take a look at some security and throttling configurations.

Tuesday, December 2, 2008

Sanity check: 10 dirty little secrets you should know about working in IT

If you are preparing for a career in IT or are new to IT, many of the “dirty little secrets” listed below may surprise you because we don’t usually talk about them out loud. If you are an IT veteran, you’ve probably encountered most of these issues and have a few of your own to add — and please, by all means, take a moment to add them to the discussion. Most of these secrets are aimed at network administrators, IT managers, and desktop support professionals. This list is not aimed at developers and programmers — they have their own set of additional dirty little secrets — but some of these will apply to them as well.

10.) The pay in IT is good compared to many other professions, but since they pay you well, they often think they own you

Although the pay for IT professionals is not as great as it was before the dot-com flameout and the IT backlash in 2001-2002, IT workers still make very good money compared to many other professions (at least the ones that require only an associate’s or bachelor’s degree). And there is every reason to believe that IT pros will continue to be in demand in the coming decades, as technology continues to play a growing role in business and society. However, because IT professionals can be so expensive, some companies treat IT pros like they own them. If you have to answer a tech call at 9:00 PM because someone is working late, you hear, “That’s just part of the job.” If you need to work six hours on a Saturday to deploy a software update to avoid downtime during business hours, you get, “There’s no comp time for that since you’re on salary. That’s why we pay you the big bucks!”

9.) It will be your fault when users make silly errors

Some users will angrily snap at you when they are frustrated. They will yell, “What’s wrong with this thing?” or “This computer is NOT working!” or (my personal favorite), “What did you do to the computers?” In fact, the problem is that they accidentally deleted the Internet Explorer icon from the desktop, or unplugged the mouse from the back of the computer with their foot, or spilled their coffee on the keyboard.

8.) You will go from goat to hero and back again multiple times within any given day

When you miraculously fix something that had been keeping multiple employees from being able to work for the past 10 minutes — and they don’t realize how simple the fix really was — you will become the hero of the moment and everyone’s favorite employee. But they will conveniently forget about your hero anointment a few hours later when they have trouble printing because of a network slowdown — you will be enemy No. 1 at that moment. But if you show users a handy little Microsoft Outlook trick before the end of the day, you’ll soon return to hero status.

7.) Certifications won’t always help you become a better technologist, but they can help you land a better job or a pay raise

Headhunters and human resources departments love IT certifications. They make it easy to match up job candidates with job openings. They also make it easy for HR to screen candidates. You’ll hear a lot of veteran IT pros whine about techies who were hired based on certifications but who don’t have the experience to effectively do the job. They are often right. That has happened in plenty of places. But the fact is that certifications open up your career options. They show that you are organized and ambitious and have a desire to educate yourself and expand your skills. If you are an experienced IT pro and have certifications to match your experience, you will find yourself to be extremely marketable. Tech certifications are simply a way to prove your baseline knowledge and to market yourself as a professional. However, most of them are not a good indicator of how good you will be at the job.

6.) Your nontechnical co-workers will use you as personal tech support for their home PCs

Your co-workers (in addition to your friends, family, and neighbors) will view you as their personal tech support department for their home PCs and home networks. They will e-mail you, call you, and/or stop by your office to talk about how to deal with the virus that took over their home PC or the wireless router that stopped working after the last power outage and to ask you how to put their photos and videos on the Web so their grandparents in Iowa can view them. Some of them might even ask you if they can bring their home PC to the office for you to fix it. The polite ones will offer to pay you, but some of them will just hope or expect you can help them for free. Helping these folks can be very rewarding, but you have to be careful about where to draw the line and know when to decline. For help, take a look at TechRepublic’s free download “Ten ways to decline a request for free tech support.”

5.) Vendors and consultants will take all the credit when things work well and will blame you when things go wrong

Working with IT consultants is an important part of the job and can be one of the more challenging things to manage. Consultants bring niche expertise to help you deploy specialized systems, and when everything works right, it’s a great partnership. But you have to be careful. When things go wrong, some consultants will try to push the blame off on you by arguing that their solution works great everywhere else so it must be a problem with the local IT infrastructure. Conversely, when a project is wildly successful, there are consultants who will try to take all of the credit and ignore the substantial work you did to customize and implement the solution for your company.

4.) You’ll spend far more time babysitting old technologies than implementing new ones

One of the most attractive things about working in IT is the idea that we’ll get to play with the latest cutting edge technologies. However, that’s not usually the case in most IT jobs. The truth is that IT professionals typically spend far more time maintaining, babysitting, and nursing established technologies than implementing new ones. Even IT consultants, who work with more of the latest and greatest technologies, still tend to work primarily with established, proven solutions rather than the real cutting edge stuff.

3.) Veteran IT professionals are often the biggest roadblock to implementing new technologies

A lot of companies could implement more cutting edge stuff than they do. There are plenty of times when upgrading or replacing software or infrastructure can potentially save money and/or increase productivity and profitability. However, it’s often the case that one of the largest roadblocks to migrating to new technologies is not budget constraints or management objections; it’s the veteran techies in the IT department. Once they have something up and running, they are reluctant to change it. This can be a good thing because their jobs depend on keeping the infrastructure stable, but they also use that as an excuse to not spend the time to learn new things or stretch themselves in new directions. They get lazy, complacent, and self-satisfied.

2.) Some IT professionals deploy technologies that do more to consolidate their own power than to help the business

Another subtle but blameworthy thing that some IT professionals do is select and implement technologies based on how well those technologies make the business dependent on the IT pros to run them, rather than which ones are truly best for the business itself. For example, IT pros might select a solution that requires specialized skills to maintain instead of a more turnkey solution. Or an IT manager might have more of a Linux/UNIX background and so chooses a Linux-based solution over a Windows solution, even though the Windows solution is a better business decision (or, vice versa, a Windows admin might bypass a Linux-based appliance, for example). There are often excuses and justifications given for this type of behavior, but most of them are disingenuous.

1.) IT pros frequently use jargon to confuse nontechnical business managers and hide the fact that they screwed up

All IT pros — even the very best — screw things up once in a while. This is a profession where a lot is at stake and the systems that are being managed are complex and often difficult to integrate. However, not all IT pros are good at admitting when they make a mistake. Many of them take advantage of the fact that business managers (and even some high-level technical managers) don’t have a good understanding of technology, and so the techies will use jargon to confuse them (and cover up the truth) when explaining why a problem or an outage occurred. For example, to tell a business manager why a financial application went down for three hours, the techie might say, “We had a blue screen of death on the SQL Server that runs that app. Damn Microsoft!” What the techie would fail to mention was that the BSOD was caused by a driver update he applied to the server without first testing it on a staging machine.

Saturday, November 1, 2008

Five new developments in storage infrastructure solutions

First there was Ethernet. Then, there was IP over Ethernet. Next came the mixed use of Ethernet, IP, and the SCSI command set (iSCSI) to simplify storage and to bring down the cost and complexity of storage. Today, iSCSI and Fibre Channel are fighting it out in all but the largest enterprises, and both have their pros and cons. Even though these are the two primary contenders in today’s block-level shared storage market, there are some other alternatives. The line is continuing to blur between these solutions as new initiatives are brought to market. Let’s take a look at some new developments in storage infrastructure solutions.

Faster Fibre ChannelTwo Gbps and 4 Gbps Fibre Channel are very common in the marketplace, and manufacturers are just now beginning to demonstrate 8 Gbps Fibre Channel gear. There are also standards in the works for Fibre Channel running at 10 Gbps and 20 Gbps. This venerable technology continues to improve to meet the increasingly robust storage needs demanded by the enterprise. In some cases, Fibre Channel solutions on the market rival iSCSI solutions from a price perspective (i.e., Dell/EMC AX150) for simple solutions. However, faster Fibre Channel still has the same skill set hurdles to overcome. Just about every network administrator knows IP, but Fibre Channel skills are a different matter.

iSCSI over 10G EthernetiSCSI has become a technology that deserves short-list status… and at a gigabit per second, no less. Many iSCSI naysayers point to its slower interlink speed as a reason that it won’t stack up to Fibre Channel. However, iSCSI solutions are now on the cusp of moving to 10 Gbps Ethernet, meaning that iSCSI’s link speed could surpass even the fastest Fibre Channel solutions on the market. Of course, iSCSI still has IP’s overhead and latency, so we’ll see how well 10 Gbps Ethernet performs in real-world scenarios when compared to 8 Gbps Fibre Channel.

Further, 10 Gbps Ethernet gear is still extremely expensive, so, for the foreseeable future, 10 Gbps-based iSCSI solutions probably won’t fit the budgets of many organizations considering iSCSI as a primary storage solution. All this said, interlink speed is not necessarily the primary driver for replacement storage infrastructure in the enterprise. Performance boosts are often achieved by adding more disk spindles to the infrastructure or by moving to faster disk drives (i.e., SATA to 15K RPM SAS or Fibre Channel).

Fibre channel-over-IP (FCIP)Fibre Channel-over-IP (FCIP) is a method by which geographically distributed Fibre Channel-based SANs can be interconnected with one another. In short, FCIP is designed to extend the reach of Fibre Channel networks over wide distances.

Internet Fibre Channel Protocol (iFCP)Internet Fibre Channel Protocol (iFCP) is an effort to bring an IP-based infrastructure to the Fibre Channel world. Much of the cost of Fibre Channel is necessary infrastructure, such as dedicated host bus adapters (HBAs) and switches. These components can, on a per-port basis, add thousands of dollars to connect a server to the storage infrastructure. In contrast, transmitting Fibre Channel commands over an IP network would drive down infrastructure costs in a major way, requiring only gigabit Ethernet connections, which are already found on most servers. Further, even high-density Gigabit Ethernet switches cost only a couple thousand dollars. The main drawback to this proposal is the limitation to 1 Gbps Ethernet; although 10 Gbps gear is available, it would negate some of the cost benefit. On the plus side, iFCP (even on 10 Gbps Ethernet) would open Fibre Channel solutions to administrators that have IP-based skill sets. iFCP was ratified by the Internet Engineering Task Force in late 2002/early 2003.

ATA-over-Ethernet (AoE)ATA-over-Ethernet (AoE) hasn’t enjoyed the popularity of iSCSI, but this isn’t due to any technical hurdles. The AoE specification is completely open and only eight pages in length. AoE doesn’t have the overhead of IP as does iSCSI since it runs right on top of Ethernet. Of course, this does limit AoE’s use to single locations, generally, since raw Ethernet can’t be routed. You can find more about AoE in one of my previous posts.

SummaryThe future of storage is wide open. Between iSCSI, Fibre Channel ,and even AoE, solutions abound for organizations of any size and as the lines blur between some of these technologies, cost becomes less of an issue across the board.

Intel open sources Fibre Channel over Ethernet package

has released a software package that is intended to encourage the development of Fibre Channel over Ethernet (FCoE) products for the Linux operating system.

If you are scratching your head about what FCoE is, here’s an excerpt from Network World:

FCoE is a proposed specification that allows Fibre Channel storage-area-network (SAN) traffic to run over Ethernet. Consolidating LAN and SAN traffic onto a single fabric is said to simplify network infrastructure in the data center.

Linux developers can test and modify the FCoE software stack as part of the released package.

First 8Gbps Fibre Channel products are out

It appears that the first 8Gbps Fibre Channel storage networking products are out, as reported by The Register. Still, the sentiment is that it will be unlikely that this new technology will do much to stem the drift to iSCSI over 10Gbps Ethernet, although it might perhaps slow it somewhat.

The main advantage of 8Gbps is that it not only uses the same infrastructure as earlier generations of Fibre Channel, but it is also backwards compatible to them. Slap the new 8Gbps devices onto an existing SAN, and they should interoperate without any issues, automatically running at the highest speed supported by both ends of the channel.

Interestingly, most SAN users have not (even) reached the limits of 2Gbps technology, never mind 4Gbps, according to Enterprise Strategy Group analyst Brian Garrett.

However, he hastened to add:

Administrators of infrastructure applications like disk-to-disk replication and vertical business applications like video post-production are already asking for higher performance storage networks.

The backwards compatibility of 8Gbps Fibre Channel will be warmly embraced in data centers, video production houses, and other application environments where performance counts.

The first 8Gbps products are promised by Emulex and QLogic, and according to the companies, they should be available for just a 10 to 20 percent price premium over existing 4Gbps products. While Brocade and Cisco have not yet made any announcements, I’m sure that they aren’t too far behind.

Fibre Channel and Ethernet starting to converge

Ethernet, the longtime standard for LAN traffic, is seeing another upgrade on the horizon, with 10 Gbps Ethernet beginning to explode onto the market. The speed upgrade will help Ethernet and Fibre Channel, the longtime standard for SAN traffic, converge onto one high speed network, linking servers in large farms to the storage arrays that store their data. Intel has just released “barely out of Alpha” code for Fibre Channel over Ethernet (FCoE) for Linux, though only for a specific release and configuration.

Cisco has seen sales of 10 Gbps Ethernet ports triple since they entered the market in the second quarter of 2007. The strong sales indicate that there is still plenty of demand for increased bandwidth in the data center. The ability to send Fibre Channel packets over Ethernet will help to reduce the number of data centers that have to maintain two architectures — one for storage and another for servers.

Until recently, I didn’t think that I would have 10 Gbps Ethernet in my shop, because we are so small. However, if I can use Ethernet to access my NAS and iSCSI boxes rather than Fibre Channel, I can see us bypassing SAN technology altogether in favor of technology that fits in better with what we are doing already. Do you see 10 Gbps in your data center in the near future?

Shared block-level storage continues to become more accessible

considered entitling this post “Is storage becoming commoditized?” but the technical definition of “commodity” doesn’t quite fit the bill. My question is this: Is the market for shared block-level storage continuing to become more accessible to a wider variety of customer? Personally, I think it is, and this is a good thing. With one exception, for most of my career, I’ve worked for fairly small organizations. A few years ago, the idea of a Fibre Channel-based SAN didn’t even get raised because of the cost and complexity of such a solution. It was RAID all the way in most servers. For some servers, even RAID wasn’t considered due to cost. Remember, RAID and SCSI drives used to be expensive!

Now, though, the storage market has exploded. With the introduction of iSCSI and new breeds of Fibre Channel being offered, it seems like there is something for everyone and at every price range. Here are some examples:

Dell AX150 array, Fibre Channel, 6TB raw, dual processors, refurbished, not scalable, 10 hosts max: $7,500.
EqualLogic PS400E, iSCSI, 10.5TB raw, fully redundant, scalable, unlimited hosts: $60K - $65K.
Overland ULTAMUS RAID 4800, Fibre Channel (4Gb), 18TB raw, redundant: $42K.
Left Hand Networks NSM 160, iSCSI, 2TB raw, redundant with three units (6TB): guess - ~ $40K or so.
Nexsan SATABoy, Fibre Channel/iSCSI, 7TB raw: $18K.
Nexsan SATABeast, Fibre Channel/iSCSI, 42TB raw: $55K.
Please don’t use these prices for your budget. I Googled for this information, so some may be out of date. The point of this exercise, however, is to demonstrate that choice and price is all over the map. If you need shared storage for 2 or 3 servers and are on a super-tight budget, buy the Dell AX150. If money isn’t an object and you want “best of breed” iSCSI, go for the EqualLogic PS400E. If your storage needs are a little more modest and budget is somewhat important, look to the SATABoy. For kicks, take a look at the SATABeast specs, too. At $55K for 42TB, it easily wins the price/TB comparison and supports both Fibre Channel (4Gb no less) and iSCSI.

Every time I look, there is something new to consider in the storage space. Sure, not all of the new options have whizbang new features, but they are certainly providing additional choice at prices that are all over the map. As a result, although the storage market is becoming a little more complex to navigate, there is incredible opportunity for customers of almost any size to take part in the shared block-level storage game.

iSCSI anyone?

iSCSI is a technology which seems to have been cropping up a
lot recently—while visiting a conference on the topic of data protection and
compliance, iSCSI was being pushed as ‘the next big thing’ in storage.

So what is iSCSI? iSCSI is a protocol defined by the
Internet Engineering Task Force (IETF) which enables SCSI commands to be
encapsulated in TCP/IP traffic, thus allowing access to remote storage over low
cost IP networks.

What advantages would using an iSCSI Storage Area Network
(SAN) give to your organisation over using Direct Attached Storage (DAS) or a
Fibre Channel SAN?

iSCSI
is cost effective, allowing use of low cost Ethernet rather than expensive
Fibre architecture.
Traditionally
expensive SCSI controllers and SCSI disks no longer need to be used in
each server, reducing overall cost.
Many
iSCSI arrays enable the use of cheaper SATA disks without losing hardware
RAID functionality.
The
iSCSI storage protocol is endorsed by Microsoft, IBM and Cisco, therefore
it is an industry standard.
Administrative/Maintenance
costs are reduced.
Increased
utilisation of storage resources.
Expansion
of storage space without downtime.
Easy
server upgrades without the need for data migration.
Improved
data backup/redundancy.
You’ll notice that I mentioned reduced administrative costs;
I was very interested to find this document prepared
by Adaptec on the cost advantages of iSCSI SAN over DAS or Fibre Channel
SAN—most notably the Total Cost of Ownership analysis, stating that one
administrator can manage 980GB of DAS storage, whereas the same administrator
could manage 4800GB of SAN storage. Quite an increase!

Isn’t there going to be a bandwidth issue with all of this
data flying around? Well, this is a question I had but found the answers in
this very informative ‘iSCSI
Technology Brief’ from Westek UK. Direct
attached U320 SCSI gives a theoretical data transfer rate of 320Mbytes/s; on a
standard Gigabit network, iSCSI will provide around 120Mbytes/s; and Fibre
Channel provides up to 200Mbytes/s, but at considerable cost. 120Mbytes/s is
probably fast enough for all but the most demanding applications. All
connectivity between the iSCSI storage and your servers would be on a dedicated
Ethernet network, therefore not interfering with your standard network traffic
(and vice versa). If this isn’t enough, 10Gbit copper Ethernet is now pushing
its way on to the market and costs are falling—this would give a possible
1Gbyte/s of throughput!

Most iSCSI devices I have seen give the ability to take
‘snapshots;’ this snapshot will only save changes made to the file system since
the previous snapshot—meaning you won’t need to put aside huge amounts of
storage while maintaining the possibility of rolling back to a previous state
after disaster (data corruption/deletion). Snapshots only take a few seconds to
perform (compared to hours for a traditional image to be created) and can be
scheduled for regular, automatic creation.

I have recently been asked to look at consolidating our
storage, and iSCSI looks like an innovative, well supported, and cost effective
way of doing this. The Power iSCSI range from Westek UK looks very promising
with the option of 10GBit connectivity, Hardware RAID6 (offsetting reliability
concerns due to SATA disks), plus an option of real-time replication and
fail-over between two units.

Have you deployed iSCSI-based SAN within your organisation?
Do you know of any other iSCSI appliance providers offering innovative
features? Maybe you decided to go with Fibre Channel instead? What kind of data
transfer rates do you require for your storage? Do you feel modern SATA disks
provide good enough performance and reliability or are expensive SCSI disks
still worth the premium?

Tuesday, October 28, 2008

Windows Home Server - Real-life scenario

I’ve been running Windows Home Server for just under a year now and thought I’d take a little time to explain my setup in detail and explain why I use this product when I could also simply build a Linux server to do many of the things handled by WHS.

My setup
Late last year, I bought an HP MediaSmart EX470 Windows Home Server for a project I was working on. Prior to buying the MediaSmart system, I had built a custom system with an evaluation copy of Windows Home Server provided by Microsoft, and gave it up in favor of the HP server. The HP MediaSmart systems ship with a paltry 512MB of RAM, but, with a little know-how, it’s not all that hard to upgrade to 2GB of RAM, which is almost a must. Frankly, HP will probably have to address the RAM issue at some point and give customers the option of easily expanding the RAM without voiding the warranty. The EX470 ships with a single 500GB hard drive. In order to enjoy the full benefit of Windows Home Server, you really need multiple hard drives. Since installing my server, I’ve added three more 500GB drives for a total of 2TB capacity. While that sounds like a ton of space, due to the way that WHS uses disk space, it’s actually less than it sounds like. This is not meant to be a negative point… just fact.

The MediaSmart server includes a gigabit Ethernet port and I’ve connected it, as well as my two primary workstations, to a gigabit Ethernet switch. I also use a wireless-N network at home to connect my wife’s Windows desktop computer and my MacBook to the network. I run VMware Fusion on my MacBook so I can run Windows programs.

How I use WHS
I save almost everything to my Windows Home Server. I write a lot, so all of my work is stored there, as is my iTunes library, backups of my DVDs and a lot more. All of the computers in my house are automatically backed up to my server, too. I have personally used WHS’ client restoration capability to restore a client computer and it’s an absolutely fantastic and surprisingly easy to use procedure.

Although WHS Power Pack 1 now includes the ability to backup the Windows Home Server to an external hard drive, a feature that was missing from the OEM release, I’ve opted to use Windows Home Server Gold Plan ($199/year, but right now, $99/year special) to automatically back up mu Windows Home Server to KeepVault’s servers. I’ve been using KeepVault for almost a year now and am very pleased. The only disadvantage to this method is that KeepVault won’t back up files that are larger than 5GB in size, but KeepVault provides unlimited storage space. The only files I have that are larger than 5GB in size are generally ISO files and virtual machine images and, if I so desired, I could take steps to protect even these files. However, for performance reasons, I don’t run my virtual machines from my server anyway, although I would give it a shot if WHS included a good way to handle iSCSI.

With the Power Pack 1 release, WHS is finally ready for prime time. Prior to this release, WHS suffered from a serious data corruption bug which, unfortunately, I feel victim to. The resulting damage was more of an annoyance as I had to work around it, but as I said, PP1 fixes this issue and adds some additional capability.

Windows Home Server includes very good remote access capability, too. When I’m on the road for business, I don’t have to try to remember exactly which files I need to take with me. If I forget something, I can just browse to my server and get the file. Configuring this capability is a breeze, too, as long as you have a router that supports uPnP, which I do. Otherwise, it would take manual router configuration, making WHS less than desirable for the average home user.

Could I have replicated this functionality with Linux, other open source products and some scripts? Sure. Would it have worked. Well, probably not as seamlessly. Even something like WHS is a tool for me and I’ve gotten to a point where I just need stuff to work so that I can focus on getting a job done. My WHS system protects my files at two levels-locally in the event of a client failure, and remotely in the event of a server failure-and gives me an easy way to get to my information if necessary.

Although the market need is still somewhat questionable, WHS is aimed at users that lack the technical expertise to build computers from scratch or that want to focus on the end result of the product-a working, stable server. For those that enjoy the thrill of building something from scratch, WHS is probably not for you. For me, however, it’s a perfect complement to my clients and perfectly fits my work style.

Help! My SQL Server Log File is too big!!!

Over the years, I have assisted so many different clients whose transactional log file has become “too large” that I thought it would be helpful to write about it. The issue can be a system crippling problem, but can be easily avoided. Today I’ll look at what causes your transaction logs to grow too large, and what you can do to curb the problem.

Note: For the purposes of today’s article, I will assume that you’re using SQL Server 2005 or later.

Every SQL Server database has at least two files; a data file and a transaction log file. The data file stores user and system data while the transaction log file stores all transactions and database modifications made by those transactions. As time passes, more and more database transactions occur and the transaction log needs to be maintained. If your database is in the Simple recovery mode, then the transaction log is truncated of inactive transaction after the Checkpoint process occurs. The Checkpoint process writes all modified data pages from memory to disk. When the Checkpoint is performed, the inactive portion of the transaction log is marked as reusable.

Transaction Log Backups
If your database recovery model is set to Full or Bulk-Logged, then it is absolutely VITAL that you make transaction log backups to go along with your full backups. SQL Server 2005 databases are set to the Full recovery model by default, so you may need to start creating log backups even if you haven’t ran into problems yet. The following query can be used to determine the recovery model of the databases on your SQL Server instance.

SELECT name, recovery_model_descFROM sys.databasesBefore going into the importance of Transactional Log Backups, I must criticize the importance of creating Full database backups. If you are not currently creating Full database backups and your database contains data that you cannot afford to lose, you absolutely need to start. Full backups are the starting point for any type of recovery process, and are critical to have in case you run into trouble. In fact, you cannot create transactional log backups without first having created a full backup at some point.

The Full or Bulk-logged Recovery Mode
With the Full or Bulk-Logged recovery mode, inactive transactions remain in the transaction log file until after a Checkpoint is processed and a transaction log backup is made. Note that a full backup does not remove inactive transactions from the transaction log. The transaction log backup performs a truncation of the inactive portion of the transaction log, allowing it to be reused for future transactions. This truncation does not shrink the file, it only allows the space in the file to be reused (more on file shrinking a bit later). It is these transaction log backups that keep your transaction log file from growing too large. An easy way to make consistent transaction log backups is to include them as part of your database maintenance plan.

If your database recovery model is set to FULL, and you’re not creating transaction log backups and never have, you may want to consider switching your recovery mode to Simple. The Simple recovery mode should take care of most of your transaction log growth problems because the log truncation occurs after the Checkpoint process. You’ll not be able to recover your database to a point in time using Simple, but if you weren’t creating transactional log backups to begin with, restoring to a point in time wouldn’t have been possible anyway. To switch your recovery model to Simple mode, issue the following statement in your database.

ALTER DATABASE YourDatabaseNameSET RECOVERY SIMPLENot performing transaction log backups is probably the main cause for your transaction log growing too large. However, there are other situations that prevent inactive transactions from being removed even if you’re creating regular log backups. The following query can be used to get an idea of what might be preventing your transaction log from being truncated.

SELECT name, log_reuse_wait_descFROM sys.databasesLong-Running Active TransactionsA long running transaction can prevent transaction log truncation. These types of transactions can range from transactions being blocked from completing to open transactions waiting for user input. In any case, the transaction ensures that the log remain active from the start of the transaction. The longer the transaction remains open, the larger the transaction log can grow. To see the longest running transaction on your SQL Server instance, run the following statement.

DBCC OPENTRANIf there are open transactions, DBCC OPENTRAN will provide a session_id (SPID) of the connection that has the transaction open. You can pass this session_id to sp_who2 to determine which user has the connection open.

EXECUTE sp_who2 spidAlternatively, you can run the following query to determine the user.

SELECT * FROM sys.dm_exec_sessionsWHERE session_id = spid --from DBCC OPENTRANYou can determine the SQL statement being executed inside the transactions a couple of different ways. First, you can use the DBCC INPUTBUFFER() statement to return the first part of the SQL statement

DBCC INPUTBUFFER(spid) --from DBCC OPENTRANAlternatively, you can use a dynamic management view included in SQL Server 2005 to return the SQL statement:

SELECT

r.session_id,

r.blocking_session_id,

s.program_name,

s.host_name,

t.text

FROM

sys.dm_exec_requests r

INNER JOIN sys.dm_exec_sessions s ON r.session_id = s.session_id

CROSS APPLY sys.dm_exec_sql_text(r.sql_handle) t

WHERE

s.is_user_process = 1 AND

r.session_id = SPID --FROM DBCC OPENTRANBackupsLog truncation cannot occur during a backup or restore operation. In SQL Server 2005 and later, you can create a transaction log backup while a full or differential backup is occurring, but the log backup will not truncate the log due to the fact that the entire transaction log needs to remain available to the backup operation. If a database backup is keeping your log from being truncated you might consider cancelling the backup to relieve the immediate problem.

Transactional ReplicationWith transactional replication, the inactive portion of the transaction log is not truncated until transactions have been replicated to the distributor. This may be due to the fact that the distributor is overloaded and having problems accepting these transactions or maybe because the Log Reader agent should be ran more often. IF DBCC OPENTRAN indicates that your oldest active transaction is a replicated one and it has been open for a significant amount of time, this may be your problem.

Database MirroringDatabase mirroring is somewhat similar to transactional replication in that it requires that the transactions remain in the log until the record has been written to disk on the mirror server. If the mirror server instance falls behind the principal server instance, the amount of active log space will grow. In this case, you may need to stop database mirroring, take a log backup that truncates the log, apply that log backup to the mirror database and restart mirroring.

Disk SpaceIt is possible that you’re just running out of disk space and it is causing your transaction log to error. You might be able to free disk space on the disk drive that contains the transaction log file for the database by deleting or moving other files. The freed disk space will allow for the log file to enlarge. If you cannot free enough disk space on the drive that currently contains the log file then you may need to move the file to a drive with enough space to handle the log. If your log file is not set to grow automatically, you’ll want to consider changing that or adding additional space to the file. Another option is to create a new log file for the database on a different disk that has enough space by using the ALTER DATABASE YourDatabaseName ADD LOG FILE syntax.

Shrinking the FileOnce you have identified your problem and have been able to truncate your log file, you may need to shrink the file back to a manageable size. You should avoid shrinking your files on a consistent basis as it can lead to fragmentation issues. However, if you’ve performed a log truncation and need your log file to be smaller, you’re going to need to shrink your log file. You can do it through management studio by right clicking the database, selecting All Tasks, Shrink, then choose Database or Files. If I am using the Management Studio interface, I generally select Files and shrink only the log file.

This can also be done using TSQL. The following query will find the name of my log file. I’ll need this to pass to the DBCC SHRINKFILE command.

SELECT nameFROM sys.database_filesWHERE type_desc = 'LOG'Once I have my log file name, I can use the DBCC command to shrink the file. In the following command I try to shrink my log file down to 1GB.

DBCC SHRINKFILE ('SalesHistory_Log', 1000)Also, make sure that your databases are NOT set to auto-shrink. Databases that are shrank at continuous intervals can encounter real performance problems.

TRUNCATE_ONLY and NOLOGIf you’re a DBA and have ran into one of the problems listed in this article before, you might be asking yourself why I haven’t mentioned just using TRUNCATE_ONLY to truncate the log directly without creating the log backup. The reason is that in almost all circumstances you should avoid doing it. Doing so breaks the transaction log chain, which makes recovering to a point in time impossible because you have lost transactions that have occurred not only since the last transaction log backup but will not able to recovery any future transactions that occur until a differential or full database backup has been created. This method is so discouraged that Microsoft is not including it in SQL Server 2008 and future versions of the product. I’ll include the syntax here to be thorough, but you should try to avoid using it at all costs.

BACKUP LOG SalesHistoryWITH TRUNCATE_ONLYIt is just as easy to perform the following BACKUP LOG statement to actually create the log backup to disk.

BACKUP LOG SalesHistoryTO DISK = 'C:/SalesHistoryLog.bak'Moving forward
Today I took a look at several different things that can cause your transaction log file to become too large and some ideas as to how to overcome your problems. These solutions range from correcting your code so that transactions do not remain open so long, to creating more frequent log backups. In additional to these solutions, you should also consider adding notifications to your system to let you know when your database files are reaching a certain threshold. The more proactive you are in terms of alerts for these types of events, the better chance you’ll have to correct the issue before it turns into a real problem.